Developing Android Apps With Firebase Cloud Storage
Firebase Cloud Storage provides an easy way to store user’s files, or provide existing files to the user. Additionally, heavily customisable access control is included, and all files can be browsed via a web interface. In this tutorial’s implementation, the user will be able to download sample files, and upload / delete their own arbitrary files.
This post is part of The Complete Guide to Firebase. Throughout this tutorial, you’ll need access to the Firebase Cloud Storage dashboard, and the official documentation may be useful too.
Implementation
As always, the entire Firebase Reference Project is open source, and there is a pull request for adding Firebase Cloud Storage if you just want to see the code changes required.
This tutorial assumes you already have Firebase added to your project.
Setting up Firebase Cloud Storage environment
Visiting the Cloud Storage dashboard and clicking “Get Started” will display a dialog confirming the default security rules. These rules state that any logged-in users can read and write any files, a relatively lax default ruleset! Once these default rules have been agreed to, you’ll have an empty storage “bucket”, ready to fill up with files.
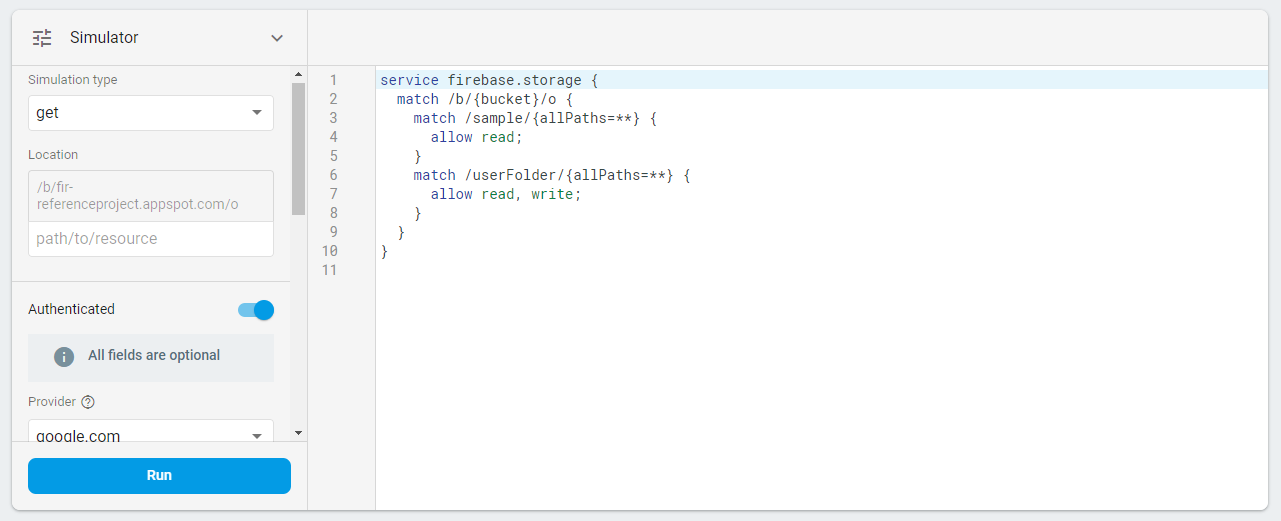
Navigate to the rules tab, and the default rules from earlier will be visible. Whilst these rules can be intricately applied, in this use case 2 directories will be configured; one non-writable (sample) and one writable (userFolder). The following config is very straightforward, and configures the 2 directories and all subdirectories / files inside them. Additionally, a maximum filesize of 5MB (5 * 1024 * 1024 bytes) will be implemented to prevent excessive storage usage. The latter part of the conditional statement (|| request.resource == null) is to allow file deletion.
service firebase.storage {
  match /b/{bucket}/o {
    match /sample/{allPaths=**} {
      allow read;
    }
    match /userFolder/{allPaths=**} {
      allow read;
      allow write: if request.resource.size < 5 * 1024 * 1024 || request.resource == null
    }
  }
}
Finally, to include Cloud Storage in your project, add the following to your app-level build.gradle. If you are prompted to update the library’s version number, do so.
implementation 'com.google.firebase:firebase-storage:16.0.4'
Obtaining a file reference
For all of the following tasks, first a file / directory reference will be needed. This is retrieved by:
- Getting a Cloud Storage instance with
storage = FirebaseStorage.getInstance() - Getting a reference with
reference = storage.child(folderName)
Now, any delete / download operations can be performed on that reference.
Retrieving file metadata from Cloud Storage
On your file reference, call .metadata, followed by .addOnSuccessListener and .addOnFailureListener:
private fun viewMetadata(reference: StorageReference) = reference.metadata
    .addOnSuccessListener {
        Toast.makeText(activity, "${it.name} has a size of ${it.sizeBytes} bytes, and is a ${it.contentType}", Toast.LENGTH_SHORT).show()
    }
    .addOnFailureListener {
        Toast.makeText(activity, "Failed to load metadata: ${it.localizedMessage}", Toast.LENGTH_SHORT).show()
    }
The StorageMetadata object returned on successful metadata retrieval contains a lot of useful information by default, and can be improved by adding custom metadata fields. It contains the name (.name), size (.sizeBytes), type (.contentType), MD5 hash (.md5Hash) and much more.
Downloading a file from Cloud Storage
First, create a local file to save the remote file into. For example, to create a temporary file with the remote file’s name prefixed by download_, use File.createTempFile("download_", reference.name).
The remote file can then be copied into the local file using reference.getFile(file). Additionally, call .addOnSuccessListener and .addOnFailureListener, to end up with the following:
private fun downloadFile(reference: StorageReference) {
    val file = File.createTempFile("download_", reference.name)
    reference.getFile(file).addOnSuccessListener {
        Toast.makeText(activity, "Saved  ${reference.name} (${it.totalByteCount}bytes) to ${file.absolutePath}!", Toast.LENGTH_LONG).show()
    }.addOnFailureListener {
        Toast.makeText(activity, "Failed to download file: ${it.localizedMessage}", Toast.LENGTH_SHORT).show()
    }
}
Uploading a file to Cloud Storage
To display a system dialog offering selection of any type of file (*/*), the following will be used:
uploadButton.setOnClickListener {
    startActivityForResult(
            Intent(Intent.ACTION_GET_CONTENT).setType("*/*"), 1234)
}
When the file selector is closed, onActivityResult will be called. Inside this, the actual upload will take place.
First, check a file was successfully selected, by exiting if the resultCode != RESULT_OK. Afterwards, convert the file path string into a Uri, and take the last part to use as a filename.
Next, create a reference to your target file’s location. In this example, getUserDirectory gets a unique bucket for each phone model, to avoid everyone using the same storage bucket. A reference is then created in this bucket using .child(name).
Finally, .putFile() uploads the actual file, with .addOnSuccessListener and .addOnFailureListener used as callbacks.
override fun onActivityResult(requestCode: Int, resultCode: Int, data: Intent?) {
    if (resultCode != RESULT_OK) return
    val uri = Uri.fromFile(File(data!!.dataString))
    val name = uri.lastPathSegment
    Toast.makeText(activity, "Beginning to upload $name", Toast.LENGTH_SHORT).show()
    getUserDirectory(FirebaseStorage.getInstance()).child(name).putFile(Uri.parse(data.dataString))
            .addOnSuccessListener {
                Toast.makeText(activity, "Successfully uploaded $name!", Toast.LENGTH_SHORT).show()
                addUserFile(uri.lastPathSegment)
                updateUserTable(FirebaseStorage.getInstance())
            }
            .addOnFailureListener {
                Toast.makeText(activity, "Failed to upload $name!", Toast.LENGTH_SHORT).show()
            }
    super.onActivityResult(requestCode, resultCode, data)
}
The addUserFile and updateUserTable functions in the above example can be ignored, as they are used to display files to the user in the example app.
Deleting a file from Cloud Storage
Deleting a file is extremely simple, just requiring calling .delete() on the file reference, along with .addOnSuccessListener and .addOnFailureListener. As with file upload, both deleteUserFile and updateUserTable are only used for the example app and can be safely ignored!
private fun deleteFile(reference: StorageReference) = reference
        .delete()
        .addOnSuccessListener {
            Toast.makeText(activity, "Deleted  ${reference.name}!", Toast.LENGTH_SHORT).show()
            deleteUserFile(reference.name)
            updateUserTable(FirebaseStorage.getInstance())
        }.addOnFailureListener {
            Toast.makeText(activity, "Failed to delete file: ${it.localizedMessage}", Toast.LENGTH_SHORT).show()
        }
Web interface
Files
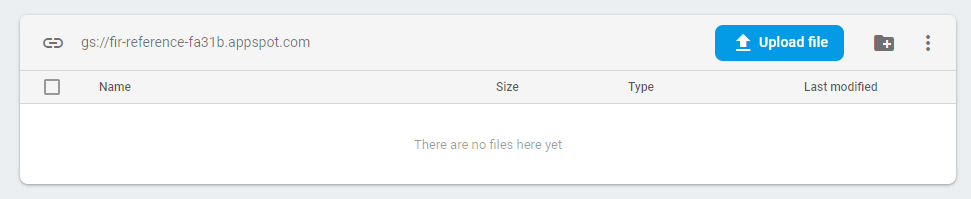
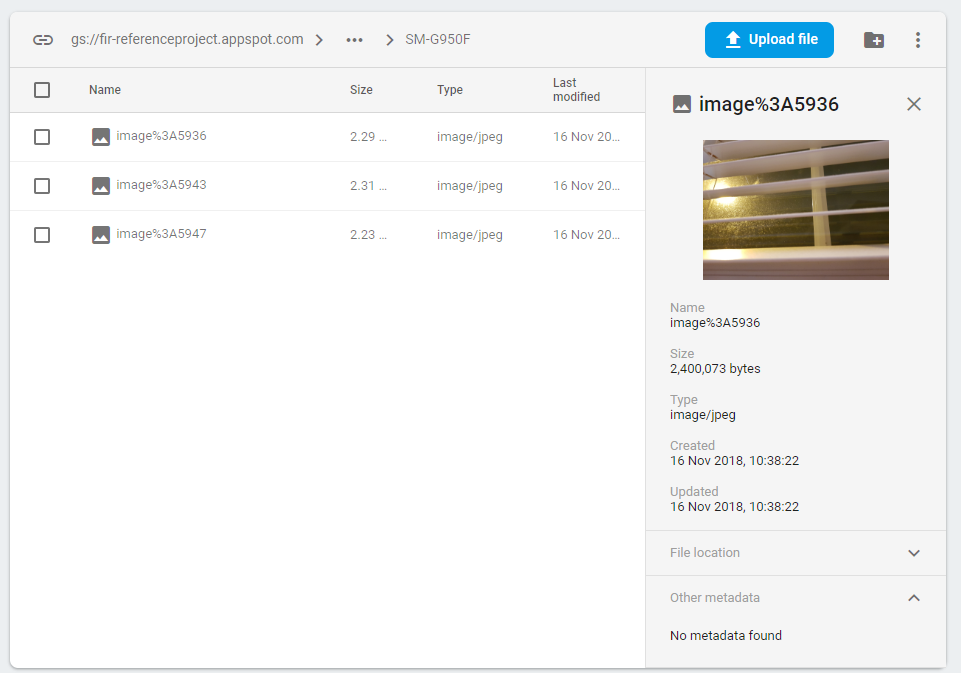
The files tab can be very useful when debugging. It provides a traditional view of all folders, subfolders, and files in your Cloud Storage bucket. Whilst you cannot rename files / folders, you can delete them and view file previews / metadata. Additionally, you can create new folders and upload files manually.
Rules
The rules tab displays your current configuration, as well as letting you test it by sending fake requests. These fake requests can be used to check if certain sections of your users have the correct permissions for various files. The fake request payload is also displayed, so you can manually enter it in request execution programs like Postman.
Usage
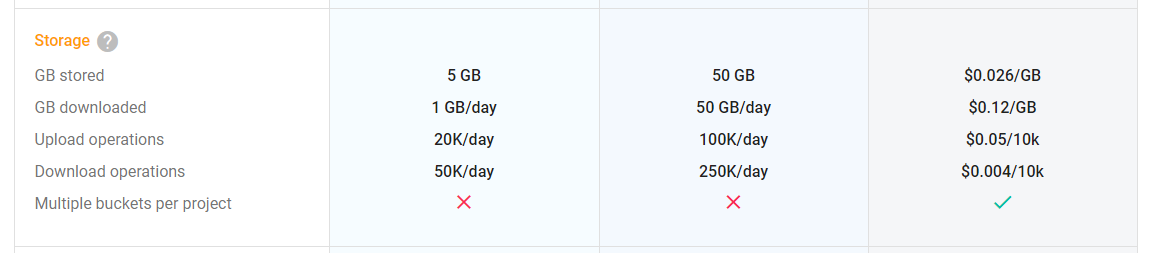
The usage tab shows a summary of your storage space used, number of files, bandwidth used, and total requests made. There are quotas for these metrics, but they are fairly generous, even for the free plan:
- Storage space used: 5TB
- Number of files: Unknown
- Bandwidth used: 1GB/day
- Total requests: 50,000 downloads & 20,000 uploads/day

Conclusion
Firebase’s Cloud Storage provides an extremely easy to use way to allow users to host files, for free. Due to this, and the quite generous 5TB total storage limit, it is a serious contender for any use cases that include user files. For example, backing up user’s data to the cloud, or sharing images in a chat program.
The 1GB/day bandwidth limit may be an issue for applications that need to transfer large files often, but should be enough for smaller implementations. Of course, since it runs on Google Cloud Platform, these limits can be scaled up to suit any use case… for a cost!
Previous: Developing Android Apps With Firebase Cloud Functions