How to use 9-patch images for resizable backgrounds in Android
In Android, almost all views can have a background colour or image set. Whilst a colour can be any size / shape, as can a vector drawable, a bitmap drawable cannot. For example, trying to make a 100px wide & 100px tall image 500px wide and 50px tall would result in a blurry, and horribly distorted background.
My early apps suffered from this often (e.g. Pixel Blacksmith), but there is a solution! So long as the image you’re using has consistent (stretchable) bars on the top and side, 9 patch images may be the answer.
9 patch images are a type of PNG (identified by their .9.png file extension) that define which parts of the image can be “stretched” to fill the required space. In this example, the corners of a background image will be marked non-stretchable, whilst the top and bottom sections will be marked as stretchable. This will result in the image being able to fit any ImageView or background.
Normal PNG
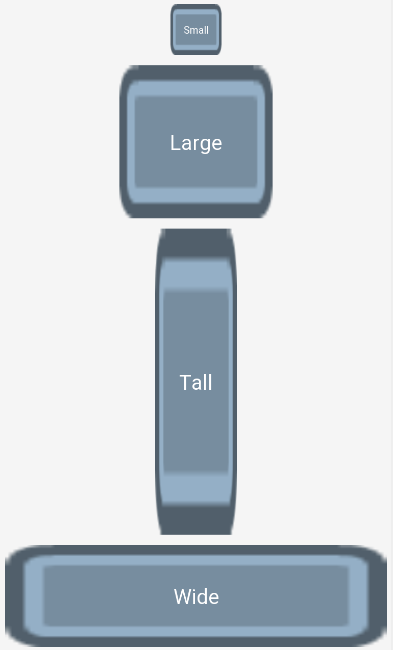
Just setting the PNG as the background technically works, as the image resizes, but the flaws are immediately obvious if you click the thumbnail on the left to view the full image.
The corners are impressively both pixellated AND blurry, as Android tries to scale the small image to a much larger area. This effect is most obvious on “Wide”, but even “Small” shows some hints of it.
9-Patch PNG
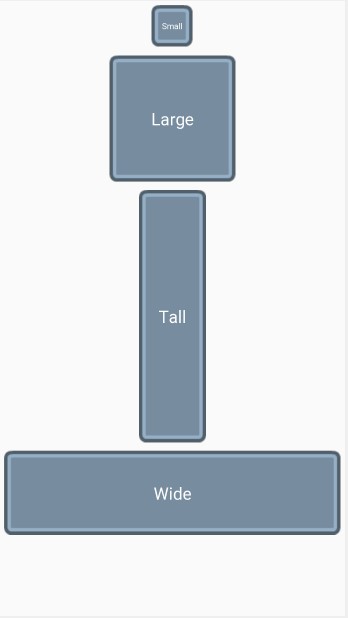
Once the image has been converted to a 9-patch, it handles all of the earlier situations perfectly. There is no blurriness or pixellation, and the “Small” square is handled just as gracefully as the larger ones.
This tutorial will walk you through the 9-patch editor, and provide a few tips for converting your own PNGs.
Introduction to 9-patch PNG editor
Android Studio’s built in 9-patch editor can be intimidating at first glance, but it’s actually very, very simple. All it does it allow you to set stretchable areas by modifying the black / transparent pixels around the edge of your image. It will also help warn you of potential issues with your 9-patch.
To create your first 9-patch:
- Inside Android Studio, right click your PNG inside
res/drawable. - Select “Create 9-Patch file…”.
- Select where the file should be placed (usually the same
res/drawablefolder). - This will open up the 9 patch editor, described below:
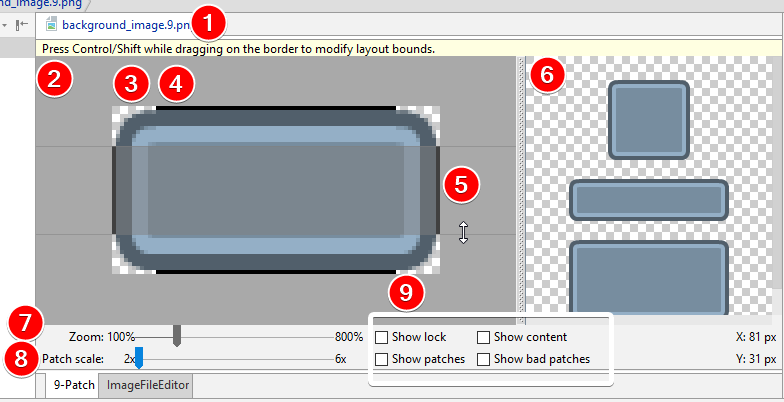
The 9-patch editor consists of:
- The 9-patch’s name.
- The editing window, where the scalable areas can be defined.
- A transparent bordered area, meaning this area cannot be stretched.
- A black bordered area, meaning this area can be stretched.
- When hovering over a side of the image, a “resize” icon lets you modify the stretchable / non-stretchable area.
- The preview pane, where the 9-patch’s appearance can be seen.
- Adjusting zoom in the editing window.
- Adjusting zoom in the preview window.
- Additional options, consisting of:
- Show lock: This highlights (in the preview pane, when moused over) which parts of the image can be changed for the 9 patch (a border of 1px).
- Show content: This highlights (in the preview pane) which parts of the drawable can contain content if it is used as a background. For example, on a
TextViewit will highlight where text can go. This is defined as the largest possible stretchable space (black outlines in diagram above). - Show patches: This highlights (in the editing pane) the stretchable areas (green) and content area (purple).
- Show bad patches: When “Show patches” is ticked, this highlights (in the editing pane) whether any of your stretchable areas are “bad”. An area is “bad” if the pixels vary in colour (except if they’re in the opposite direction to the stretch). Your 9-patch image will still work, but is likely to not look perfect. This StackOverflow answer contains a visual example.
Note: The top and left bars define which areas are stretchable, but the bottom and right actually define which areas should contain content. These are often the same, but you may want them to be slightly different (e.g. to apply a bit of extra padding around the content).
Tips for converting PNGs to 9-patch
In most cases, your 9-patch will end up perfectly symmetrical (vertically & horizontally), with black bars on all 4 edges and transparent corners. This will allow the edges to stretch, but not the corners. For example, here is how the earlier example looks in the editor:
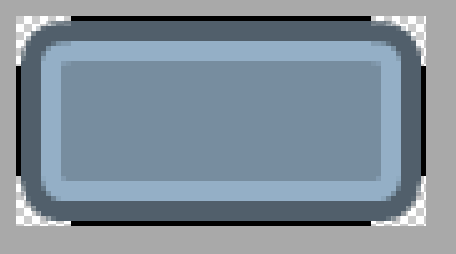
Make sure to check your image with “Show bad patches”, to make sure no almost unnoticeable stretching issues will occur.
Additionally, don’t forget to delete the original .png file, otherwise the build will fail due to duplicated resources.
Finally, if you’d like to look at the original image and play with the final 9-patch image, the repo used for this post is available on GitHub.