
Developing Android Apps With Firebase Cloud Firestore
Cloud Firestore provides an app an invisibly syncing cloud database. This takes away a lot of the complexity of ensuring data is up to date, and has very simple methods for creating, retrieving, updating, and deleting data. It also allows syncing between multiple clients, and managing the database via a web interface or an API.
Note that this service is in beta, and is intended to replace the existing Cloud Datastore. Google provides a full comparison to aid in choosing the most appropriate service.
This post is part of The Complete Guide to Firebase. Throughout this tutorial, you’ll need access to the Firebase Cloud Firestore dashboard, and the official documentation may be useful too.
Implementation
As always, the entire Firebase Reference Project is open source, and there is a pull request for adding Firebase Cloud Firestore if you just want to see the code changes required.
This tutorial assumes you already have Firebase added to your project.
Setting up
First, open the Database section of the Firebase Console. Whilst the actual database service will be covered in a separate post, this post covers the beta Cloud Firestore. Click the “Create database” button on the banner at the top of the page.
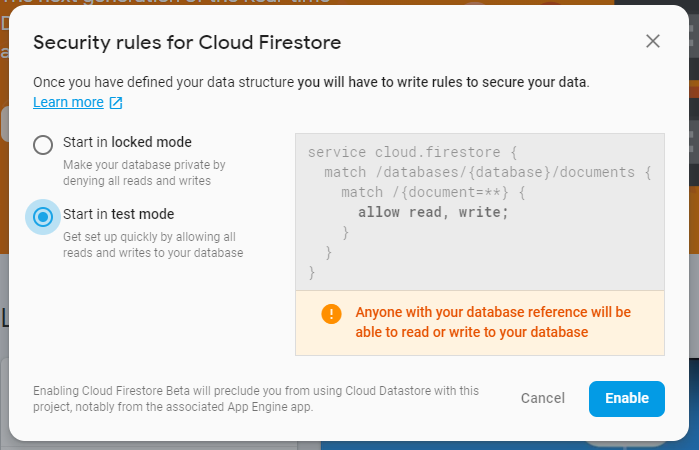
In the dialog that appears, start the database in test mode. This should never be used in production, as it allows anyone to do anything to the database! For early development though, it’s sufficient. A guide is available for configuring these security rules.
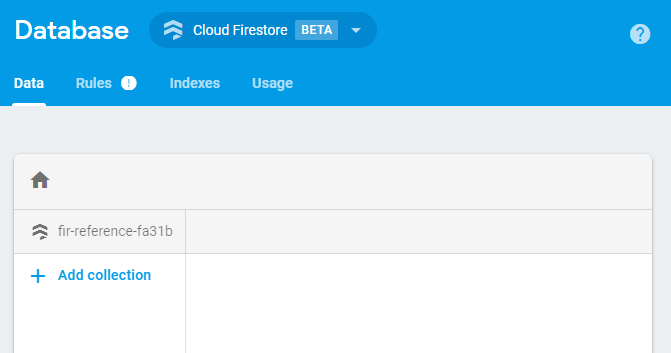
It can take 20-30 seconds for the Cloud Firestore database to start up, but once it has you’ll see an empty dashboard, since we’ve currently got no data. That’s it, the database is ready to go, now for the app!
In the app, just add the following dependency to begin using Cloud Firestore:
implementation 'com.google.firebase:firebase-firestore:17.1.1'
For all of the following examples, db is defined as FirebaseFirestore.getInstance()
Getting data (SELECT)
There are 2 ways to get data, automatically when it changes or on demand, both will be covered here.
Automatically retrieving Firestore data
Luckily, setting up a listener for data changes is extremely straightforward, and it provides a querySnapshot with the latest version of all rows. This can be run on any query, but for monitoring all data the following should be used:
db.collection(tableName).addSnapshotListener { querySnapshot, _ ->
    displayDocuments(querySnapshot!!.documents)
}
Selectively getting Firestore data
Using db.collection("MyTable") returns all documents (essentially rows) within in the “MyTable” collection (table).
db.collection(tableName)
    .orderBy("number", Query.Direction.DESCENDING)
    .limit(3)
    .get()
    .addOnCompleteListener { task ->
        if (task.isSuccessful) {
            displayDocuments(task.result?.documents!!)
        } else {
            showToast("Error getting documents: ${task.exception}")
            tableContents.text = ""
        }
    }
As with any database, usually when you’re retrieving data it’s going to be with a few criteria, all of which can be combined. For example:
- Checking value:
.whereLessThan("columnName", 100),.whereEqualTo("columnName", "value"), or.whereGreaterThanOrEqualTo("columnName", 100) - Limiting results:
.limit(5) - Ordering:
.orderBy("total", Query.Direction.DESCENDING)
Inserting data (CREATE)
Automatically setting Firestore ID
Creating a new row / document is extremely easy, and just requires passing a HashMap of columns and values to .add(). Adding listeners is simple too.
db.collection(tableName)
    .add(hashMapOf(
            "columnA" to 123,
            "columnB" to "a value"
    ) as Map)
    .addOnSuccessListener { documentReference ->
        showToast("DocumentSnapshot added with ID: ${documentReference.id}")
    }
    .addOnFailureListener { e ->
        showToast("Error adding document: $e")
    }
Manually setting Firestore ID
Whilst similar to the previous section, manually setting a Firestore ID (primary key) requires looking up the non-existent ID with .document(), then setting it’s values using set().
db.collection(tableName).document("newDocumentID")
    .set(hashMapOf(
            "columnA" to 123,
            "columnB" to "a value"
    ) as Map)
    .addOnSuccessListener {
        showToast("DocumentSnapshot added with ID: $id")
    }
    .addOnFailureListener { e ->
        showToast("Error writing document: $e")
    }
Updating data (UPDATE)
Updating rows is very straightforward, once a reference to a row is obtained .set() will do all the work of synchronising changes and resolving any conflicts.
The following snippets assumes it.id is a document reference, and updates “columnName” to “1234”:
val ref = db.collection(tableName).document(it.id)
it.data?.let {
    ref.update("columnName", 1234)
}
Deleting data (DELETE)
Similarly to updating data, deleting data just requires calling .delete() on the document reference.
val ref = db.collection(tableName).document(it.id)
ref.delete()
Web interface
Data tab
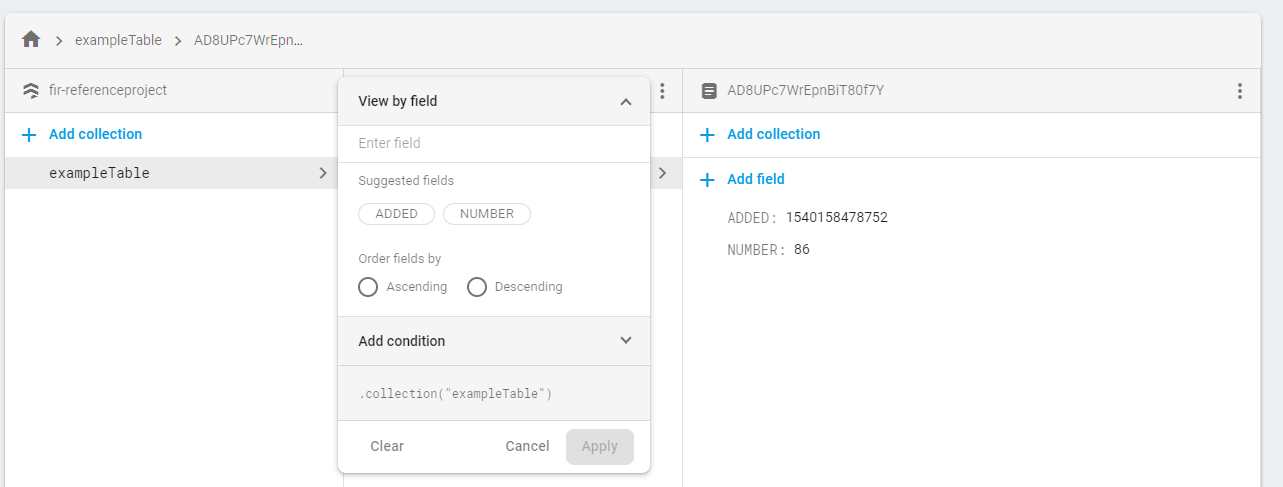
The Cloud Firestore web interface’s data tab is a convenient way of viewing all data in the database. All collections (tables), documents (rows), and fields can be added, edited, or deleted directly. This can be extremely beneficial when attempting to debug a data issue, as it allows diagnosing the issue from any device.
In addition to viewing all data, rows can be filtered using the standard selection criteria, and sorted.
Rules tab
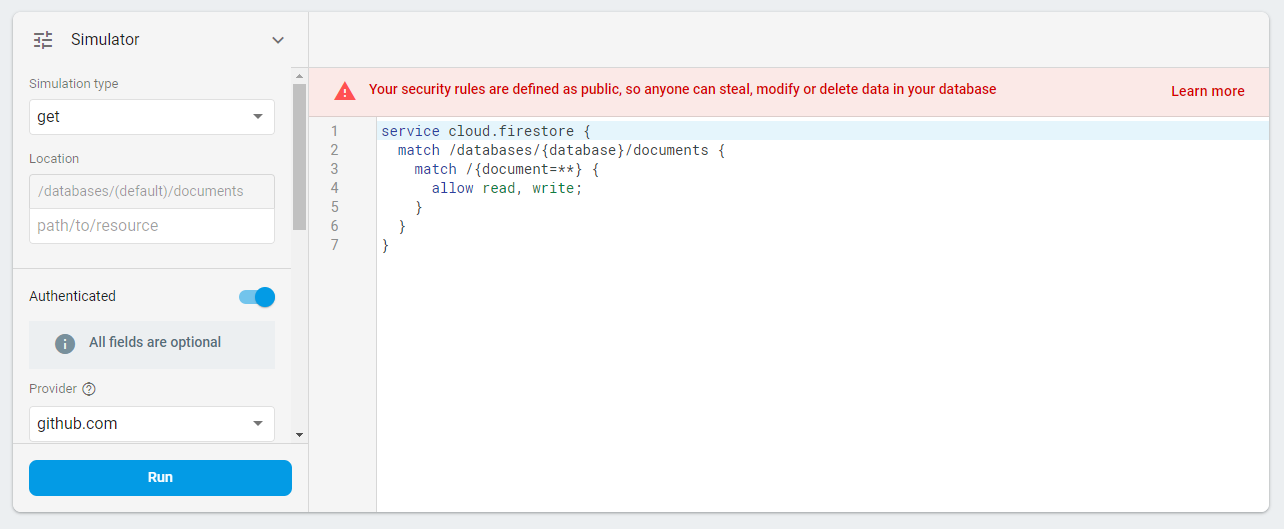
The rules tab is worth visiting before publishing any app using Cloud Firestore. Similar to routing tables in a normal server, these rules can be used to configure who can read and write what data. For example, users may be able to edit fields in their row, but not in anybody else’s. Assuming the configuration is still set to “Test” from earlier, Firestore will helpfully warn you that the configuration is a massive security risk.
The existing documentation for Firestore rules is extremely comprehensive, and the ability to simulate all requests (even with fake user authentication) helps ensure access control is correctly setup.
Indexes tab
Cloud Firestore automatically creates indexes for you, and this is usually enough to ensure solid performance. However, advanced users may wish to add custom indexes. All of these manually added indexes will be displayed here, and can be edited.
Usage tab
The usage tab just provides a link to Google Cloud Platform, which reveals Cloud Firestore’s very generous usage limits. The table below shows the capacity provided for free, which should be enough for smaller apps.
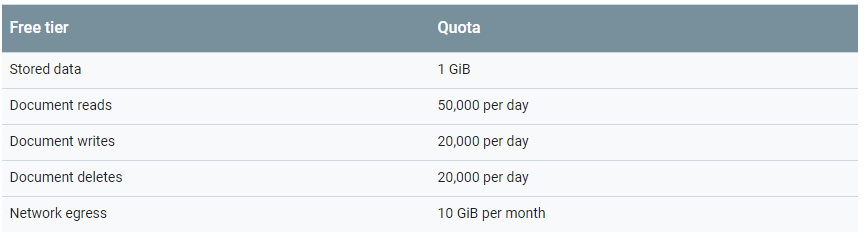
Note that there are also reasonable limits on data stored, writes, indexes, and security rules. A project’s current quota can be viewed on Google Cloud Platform.
Conclusion
Whilst it can be a little bit scary giving up control over data persistence, syncing, and access control to a cloud-based service instead of a more typical server, it has a lot of advantages. The costs can be dramatically lower, and the setup time is next to zero. In addition, it offers more reliable scalability than Firebase’s existing Datastore product, and faster feature innovation, at the cost of lacking the normal, non-beta database’s proven history. Finally, the extreme ease of hooking into other Firebase services (whilst still being able to delegate to a traditional server where necessary) makes it a very attractive offering for new systems.
Another overview of Firebase Cloud Firestore is available by @mono0926 on Medium, and an excellently in-depth look at querying Cloud Firestore has been written by Peter Ekene Eze on DZone.
Previous: Developing Android Apps With Firebase Authentication
Next: Developing Android Apps With Firebase Realtime Database