After recently struggling to make a small modification to a simple translucent overlay, I decided to experiment with gradients in Android drawables. After a few hours, I discovered a few new possibilities! Drawable gradients seem to be rarely used despite their simple syntax, with people preferring to use SVGs or static images.
I’ve included a few example outputs in this post, hopefully these help those struggling to create a gradient. I also recommend taking a look at AngryTools’ gradient generator (Android tab), to easily generate the XML for simpler gradients automatically.
| Notes | Gradient | XML |
|---|
Simple linear gradient
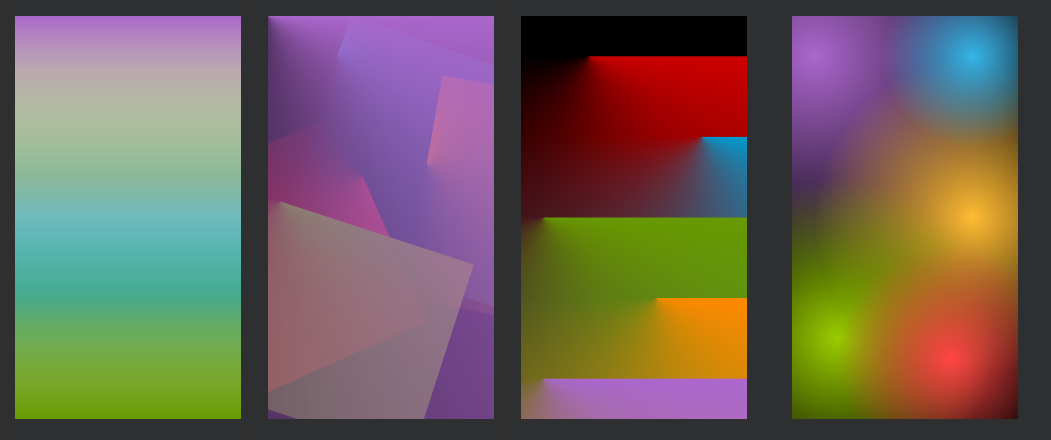
A really simple gradient to start, our first type is "linear". All we have is a startColor of white and an endColor of black, resulting in the nice smooth transition shown. |
 |
<?xml version="1.0" encoding="utf-8"?>
<shape xmlns:android="http://schemas.android.com/apk/res/android">
   <gradient android:startColor="@android:color/white" android:endColor="@android:color/black" />
</shape>
|
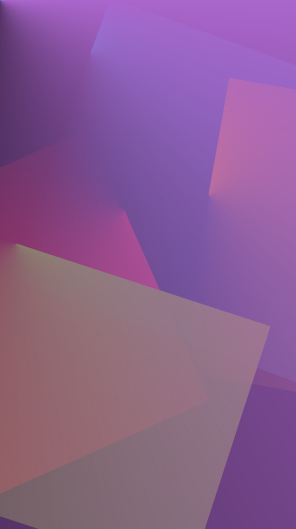
Centre offsetting
Whilst this gradient might look very similar to the previous, there's a secret inside: centerY. Setting a centre colour (holo_blue_dark in this case) allows for slightly more complex gradients, but the interesting bit happens when you redefine where the centre is. centerX and centerY will both be used extensively throughout this post, and work by redefining where the centre colour should appear. For example, a value of 20% or 0.2 will ensure your centerColor appears 20% down the drawable vertically. |
 |
<?xml version="1.0" encoding="utf-8"?>
<shape xmlns:android="http://schemas.android.com/apk/res/android">
   <gradient android:startColor="@android:color/white" android:centerColor="@android:color/holo_blue_dark" android:endColor="@android:color/black" android:centerY="0.2" />
</shape>
|
Overlapping layers
Building up on our previous gradient, adding an extra layer (via layer-list) drastically increases the complexity of the output. layer-list simply lets you overlap multiple gradients without making new ImageViews or drawables. In this case, a transparent -> black gradient has been added on top of our existing white -> blue -> black gradient, at an angle (essentially rotation) of 180. |
 |
<?xml version="1.0" encoding="utf-8"?>
<layer-list xmlns:android="http://schemas.android.com/apk/res/android">
   <item>
      <shape>
         <gradient android:startColor="@android:color/white" android:centerColor="@android:color/holo_blue_dark" android:endColor="@android:color/black" android:centerY="0.2" />
      </shape>
   </item>
   <item>
      <shape>
         <gradient android:startColor="@android:color/black" android:endColor="@android:color/transparent" android:angle="180"/>
      </shape>
   </item>
</layer-list>
|
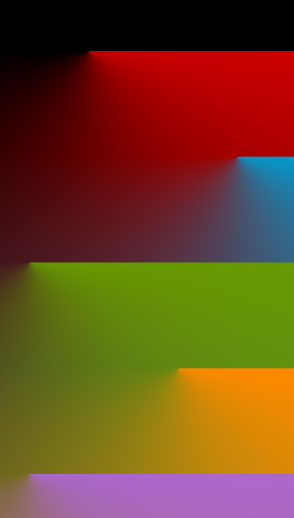
Overlapping layers at the same angle
Just as the last gradient overlapped gradients at right angles, you can also overlap them without rotating. If a layer has a transparent startColor and endColor, but a non-transparent centerColor, it will appear as a horizontal strip of colour. Offsetting this strip using centerY, then repeating the process, allows a full rainbow of colours to be created. Note that this gradient also has a base white layer, to help the gradient be visible. |
 |
<?xml version="1.0" encoding="utf-8"?>
<layer-list xmlns:android="http://schemas.android.com/apk/res/android">
   <item>
      <shape>
         <solid android:color="@android:color/white" />
      </shape>
   </item>
   <item>
      <shape>
         <gradient android:startColor="@android:color/holo_purple" android:centerColor="@android:color/transparent" android:endColor="@android:color/transparent" android:centerY="0.4" />
      </shape>
   </item>
   <item>
      <shape>
         <gradient android:startColor="@android:color/transparent" android:centerColor="@android:color/holo_orange_light" android:endColor="@android:color/transparent" android:centerY="0.4" />
      </shape>
   </item>
   <item>
      <shape>
         <gradient android:startColor="@android:color/transparent" android:centerColor="@android:color/holo_blue_light" android:endColor="@android:color/transparent" android:centerY="0.7" />
      </shape>
   </item>
   <item>
      <shape>
         <gradient android:startColor="@android:color/transparent" android:centerColor="@android:color/transparent" android:endColor="@android:color/holo_green_dark" />
      </shape>
   </item>
</layer-list>
|
Radial gradients
So far we've only seen linear gradients, now we'll use radial gradients. The easiest way of thinking about them is as a "point" of colour, radiating out. centerX and centerY can be used to move this point anywhere on the canvas, in this case 10% from the left and 10% from the top. Again, the startColor, centerColor, and endColor are used to set the colour, along with gradientRadius being used to set the overall size of the gradient. |
 |
<?xml version="1.0" encoding="utf-8"?>
<shape xmlns:android="http://schemas.android.com/apk/res/android" android:shape="rectangle">
   <gradient android:type="radial" android:gradientRadius="100%" android:startColor="@android:color/black" android:centerColor="@android:color/holo_blue_light" android:centerX="0.1" android:centerY="0.1" android:endColor="@android:color/white" />
</shape>
|
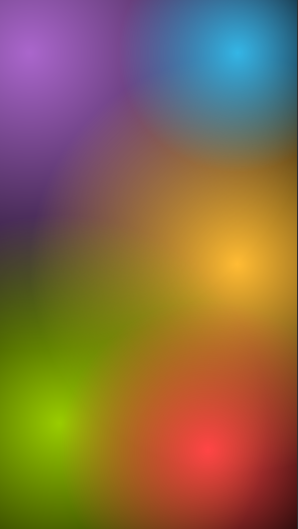
Floating blobs
Combining multiple radial gradients using the same overlapping technique as our "vertical rainbow" before, we can end up with this collection of floating blobs. This effect is often hunted for by people looking to create an Instagram style logo, and is very easy to achieve. So long as you know your colours, it's just a matter of adjusting the radius, x position, and y position until each blob is in the correct place. I used this to answer a question on StackOverflow, and the OP raised a reasonable counterpoint. If you need a particularly complex gradient, you could just try exporting an SVG / PNG. However, with vector graphics sometimes gradients aren't translated properly, and a PNG will either be too large, or may not scale perfectly to the user's screen. If possible, creating an image as a gradient drawable will ensure it is perfect! |
 |
<?xml version="1.0" encoding="utf-8"?>
<layer-list xmlns:android="http://schemas.android.com/apk/res/android">
   <item>
      <shape android:layout_height="wrap_content">
         <solid android:color="@android:color/black" />
      </shape>
   </item>
   <item>
      <shape>
         <gradient android:type="radial" android:gradientRadius="100%" android:startColor="@android:color/holo_purple" android:centerX="0.1" android:centerY="0.1" android:endColor="@android:color/transparent" />
      </shape>
   </item>
   <item>
      <shape>
         <gradient android:type="radial" android:gradientRadius="70%" android:startColor="@android:color/holo_orange_light" android:centerX="0.8" android:centerY="0.5" android:endColor="@android:color/transparent" />
      </shape>
   </item>
   <item>
      <shape>
         <gradient android:type="radial" android:gradientRadius="40%" android:startColor="@android:color/holo_blue_light" android:centerX="0.8" android:centerY="0.1" android:endColor="@android:color/transparent" />
      </shape>
   </item>
   <item>
      <shape>
         <gradient android:type="radial" android:gradientRadius="70%" android:startColor="@android:color/holo_green_light" android:centerX="0.2" android:centerY="0.8" android:endColor="@android:color/transparent" />
      </shape>
   </item>
   <item>
      <shape>
         <gradient android:type="radial" android:gradientRadius="50%" android:startColor="@android:color/holo_red_light" android:centerX="0.7" android:centerY="0.85" android:endColor="@android:color/transparent" />
      </shape>
   </item>
</layer-list>
|
Sweep gradient
The final type of gradients are sweep. These don't seem to make sense at first glance, I find the easiest way of thinking of them is as a "cone" shaped linear gradient, viewed from above. However you interpret them, they still use all the attributes we've picked up in previous gradients. |
 |
<?xml version="1.0" encoding="utf-8"?>
<shape xmlns:android="http://schemas.android.com/apk/res/android"  android:shape="rectangle">  <gradientandroid:startColor="@android:color/holo_blue_dark"android:endColor="@android:color/holo_orange_dark"android:type="sweep" /> </shape>
|
Sweep offsets
Whilst not quite as pretty as the "rainbow" or "floating blobs" seen with other gradients, offsetting radial drawables creates a pretty odd effect. I'm not entirely sure I can think of a valid use case for this, but presumably someone needs a gradient that looks like an open doorway! |
 |
<?xml version="1.0" encoding="utf-8"?>
<layer-list xmlns:android="http://schemas.android.com/apk/res/android">
   <item>
      <shape>
         <solid android:color="@android:color/black" />
      </shape>
   </item>
   <item>
      <shape>
         <gradient android:type="sweep" android:centerX="0.3" android:centerY="0.1" android:startColor="@android:color/holo_red_dark" android:centerColor="@android:color/transparent" android:endColor="@android:color/transparent"/>
      </shape>
   </item>
   <item>
      <shape>
         <gradient android:type="sweep" android:centerX="0.8" android:centerY="0.3" android:startColor="@android:color/holo_blue_dark" android:centerColor="@android:color/transparent" android:endColor="@android:color/transparent"/>
      </shape>
   </item>
   <item>
      <shape>
         <gradient android:type="sweep" android:centerX="0.1" android:centerY="0.5" android:startColor="@android:color/holo_green_dark" android:centerColor="@android:color/transparent" android:endColor="@android:color/transparent"/>
      </shape>
   </item>
   <item>
      <shape>
         <gradient android:type="sweep" android:centerX="0.6" android:centerY="0.7" android:startColor="@android:color/holo_orange_dark" android:centerColor="@android:color/transparent" android:endColor="@android:color/transparent"/>
      </shape>
   </item>
   <item>
      <shape>
         <gradient android:type="sweep" android:centerX="0.1" android:centerY="0.9" android:startColor="@android:color/holo_purple" android:centerColor="@android:color/transparent" android:endColor="@android:color/transparent"/>
      </shape>
   </item>
</layer-list>
|
Sweep rotations
Just like the last gradient, I can't think of a valid use case for this! Wrapping each shape inside a rotate allows rotating it at any angle, although interestingly it still retains the "edges" from the original shape. I suspect this is solvable by rotating the gradient not the shape, which might produce a more aesthetically pleasing output. |
 |
<?xml version="1.0" encoding="utf-8"?>
<layer-list xmlns:android="http://schemas.android.com/apk/res/android">
   <item>
      <shape>
         <solid android:color="@android:color/black" />
      </shape>
   </item>
   <item>
      <rotate android:fromDegrees="66" android:toDegrees="0" android:pivotY="50%" android:pivotX="50%">
         <shape>
            <gradient android:type="sweep" android:centerX="0.3" android:centerY="0.5" android:startColor="@android:color/holo_red_dark" android:centerColor="@android:color/transparent" android:endColor="@android:color/transparent"/>
         </shape>
      </rotate>
   </item>
   <item>
      <rotate android:fromDegrees="290" android:toDegrees="0" android:pivotY="40%" android:pivotX="30%">
         <shape>
            <gradient android:type="sweep" android:centerX="0.8" android:centerY="0.3" android:startColor="@android:color/holo_blue_dark" android:centerColor="@android:color/transparent" android:endColor="@android:color/transparent"/>
         </shape>
      </rotate>
   </item>
   <item>
      <rotate android:fromDegrees="18" android:toDegrees="0" android:pivotY="40%" android:pivotX="30%">
         <shape>
            <gradient android:type="sweep" android:centerX="0.1" android:centerY="0.5" android:startColor="@android:color/holo_green_dark" android:centerColor="@android:color/transparent" android:endColor="@android:color/transparent"/>
         </shape>
      </rotate>
   </item>
   <item>
      <rotate android:fromDegrees="280" android:toDegrees="0" android:pivotY="50%" android:pivotX="30%">
         <shape>
            <gradient android:type="sweep" android:centerX="0.6" android:centerY="0.7" android:startColor="@android:color/holo_orange_dark" android:centerColor="@android:color/transparent" android:endColor="@android:color/transparent"/>
         </shape>
      </rotate>
   </item>
   <item>
      <rotate android:fromDegrees="0" android:toDegrees="0" android:pivotY="50%" android:pivotX="30%">
         <shape>
            <gradient android:type="sweep" android:centerX="0.0" android:centerY="0.0" android:startColor="@android:color/holo_purple" android:centerColor="@android:color/transparent" android:endColor="@android:color/transparent"/>
         </shape>
      </rotate>
   </item>
</layer-list>
|
Sweep split
Finally, one little curiosity about sweep gradients. By offsetting the centerX very far to the left, you'll end up with a top and bottom that are solid colours. This creates an interesting effect, although it could obviously be done much easier by using solid! If you need a similar gradient, I recommend reading the answers on this StackOverflow question for simpler ways of achieving it. |
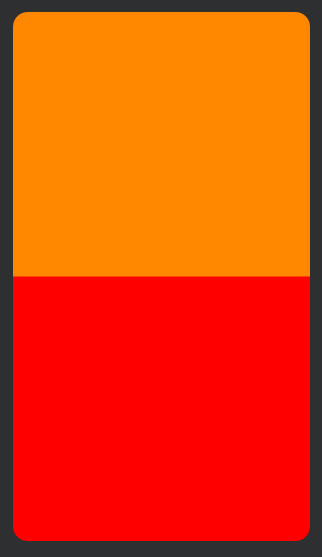 |
<?xml version="1.0" encoding="utf-8"?>
<shape xmlns:android="http://schemas.android.com/apk/res/android"  android:shape="rectangle">
   <gradient android:startColor="@android:color/red" android:endColor="@android:color/holo_orange_dark" android:centerX="-99" android:type="sweep" />
   <corners android:radius="20dp" />
</shape>
|