How to handle colours logically in a multi-flavour Android app
Handling colours in Android apps is generally pretty straightforward, as simple hex codes are used. However, standardising these across the entire app can be an easily ignored task, one which is essential for multi-flavour apps. Correctly utilising colours allows a single codebase to produce app flavours with radically different colours, e.g. to match company branding.
These article will walk through 4 “levels” of colour abstraction, in order from worst to best. A simple level 4 project using 2 app flavours is available as a GitHub repo. Please note that these levels are by no means a standard, they’re based entirely on my own experience.
Level 1: Colour codes in layouts
Just putting hex colour codes in your layout is the easiest way to immediately see results, but isn’t at all sustainable. If you want to change a colour in the future, you’ll have to find and replace every instance of the hex code, and make sure there’s not any other uses of that hex code. Not at all reliable! It’s also not possible to provide different colours for different app flavours.
<TextView
    android:layout_width="match_parent"
    android:layout_height="wrap_content"
    android:text="I'm just using the hex codes!"
    android:background="#FFFFFF"
    android:textColor="#00000"/>
Level 2: Colour names in layouts
A massive improvement over level 1 is extracting all colours to a dedicated colors.xml file. This ensures that if you decide to change a colour in the future, at least all instances of it will be changed. Additionally, app flavours can now be used to give different definitions for a colour. For example, flavour A can define “white” as a different hex code to flavour B, just by placing a new colors.xml in that flavour’s source set.
However, “white” still has to be… white, unless you want to end up with very confusing layouts! The next level will improve on this approach.
More information on product flavors is available in the official documentation.
<TextView
    android:layout_width="match_parent"
    android:layout_height="wrap_content"
    android:text="I'm using colors.xml!"
    android:background="@color/white"
    android:textColor="@color/black"/>
<resources>
    <color name="white">#FFFFFF</color>
    <color name="black">#000000</color>
</resources>
Level 3: Purpose names in layouts
An improvement essential to any multi-flavour project that has multiple colour schemes is nesting colour names, with the purpose-named colour referencing a colour-named colour. This can be tricky to explain textually, an example will make more sense:
<TextView
    android:layout_width="match_parent"
    android:layout_height="wrap_content"
    android:text="I'm using purpose names!"
    android:background="@color/textBackground"
    android:textColor="@color/textForeground"/>
<resources>
    <color name="white">#FFFFFF</color>
    <color name="black">#000000</color>
    <color name="textBackground">@color/white</color>
    <color name="textForeground">@color/black</color>
</resources>
This may seem counter-intuitive, but it has a major advantage: textBackground can now be defined in an app flavour’s colors.xml as any colour, whilst still ensuring a pre-defined palette is stuck to.
For this approach, the colors.xml file must be split into two parts:
- A limited list of colours, with hex codes, for the flavour’s internal palette. These should not be defined in any layouts, and only be referenced by other colours. An easy way to ensure this is to give them colours unique to that flavour (e.g.
MyCompanyWhite), as other flavours won’t contain this colour so will fail to build. - A lengthy list of areas that need colouring, referencing the internal palette colours. These should be used in all layouts, and it’s absolutely fine if multiple colours reference the same internal palette colour.
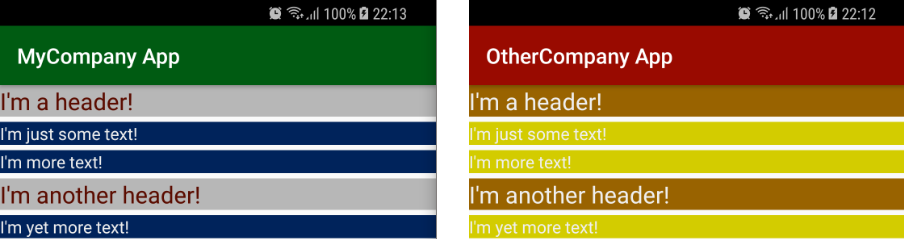
For example, textColour, titleColour, and subtitleColour may all reference MyCompanyBlue, defined as #003791. Whilst MyCompany wants them all the same colour, OtherCompany may want titles a different colour. With this approach, this can be accomplished easily without impacting any other flavours of the app.
In a current project of mine, the company’s internal palette consists of ~10 colours. These definitions are used for over 150 areas that need colouring, allowing fine-grained control over app theming. Make sure to name your colours according to a predefined system, or it’ll get out of control quickly!
Level 4: Use names in styles
The final level of logically storing colours is to extract them into styles.xml. For example, using the same TextView as before:
<TextView
    android:layout_width="match_parent"
    android:layout_height="wrap_content"
    android:text="I'm using styles!"
    style="@style/bodyText"/>
<resources>
    <color name="white">#FFFFFF</color>
    <color name="black">#000000</color>
    <color name="textBackground">@color/white</color>
    <color name="textForeground">@color/black</color>
</resources>
<resources>
    <style name="bodyText" parent="android:Widget.TextView">
        <item name="android:background">@color/textBackground</item>
        <item name="android:textColor">@color/textForeground</item>
    </style>
</resources>
Now, all TextViews will use the same abstracted colours by default (so long as the style is applied). Even better, these can easily be changed without manually fixing the colours defined on them all. Styles can (and should) be used for much, much more than just colours, but this example is keeping it simple!
As a follow-on, it is possible to make all TextViews automatically use a style, very useful in some cases.
Conclusion
It’s worth pointing out that these level definitions are only a pattern I’ve personally found to work well on multi-flavour projects. I’m always interested in alternative approaches, as I find multi-flavour development one of the most challenging but fascinating parts of Android development!
An example project is available for this post, which provides two different flavours with radically different colour schemes, using level 4: