Creating a history clearing Chrome extension
Chrome extensions are small plugins that modify how Chrome (or websites viewed in it) look and behave. These can notify you of events (e.g. Google Mail Checker or Inoreader Companion), modify sites (e.g. Reddit Enhancement Suite or uBlock Origin), or add functionality (e.g. HTTPS Everywhere).
A couple of years ago, I made a very simple Chrome extension called Selective Scrubber that removed predefined domains & terms from your Chrome history. This tutorial will cover the code behind it, as well as how to upload an extension like this.
Before diving into this project, I strongly recommend looking at the final result, and checking out the extension’s repository. It’s also worth noting that this extension doesn’t work if using Chrome history sync, due to a long-standing bug (4 years!).
Creating extension framework
To start, we’re going to use the simplest extension possible, a project folder containing a file called manifest.json. Add the following into the file:
{
    "name": "My extension",
    "version": "1.0.0",
    "description": "My extension doesn't do anything yet!",
    "manifest_version": 2
}
Technically you’ve now created an extension, congratulations! There’s a bit more work to do for it to be actually useful however…
Preparing Chrome for extension development
Before any extension code can be run, running local unpacked extensions must be enabled. This is done by navigating to your extensions page (chrome://extensions/), and:
- Toggling “Developer mode” to on in the top right.
- Selecting the newly visible “Load unpacked” option.
- Selecting your project folder.
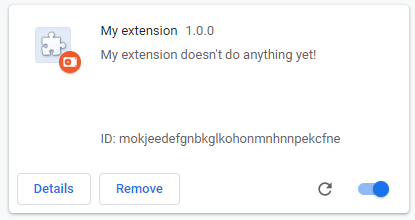
Your extension should now be visible in your extensions list! The little “Reload” icon must be clicked after every time you make code changes to make Chrome run the updated code.
Preparing the manifest
First, add the following snippet to your manifest.json file, to tell Chrome that we’re going to be using a background JavaScript file:
"background": {
    "persistent": false,
    "scripts": ["js/clear_history.js"]
},
Next, create a folder called js and add clear_history.js into it. This can be left empty for now.
We’re also going to have an options page, so that must be registered in the manifest.json too:
"options_ui": {
    "page": "options.html",
    "chrome_style": true
}
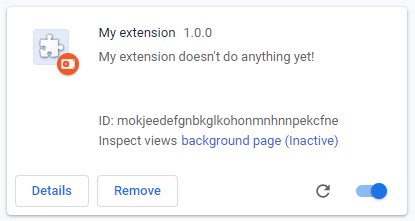
Again, create the options.html page in the project folder. After reloading the extension (with the reload button on the extension’s card), you should now see a “Inspect views background page” link. Clicking this won’t do anything, but it’s presence confirms your background script earlier has been registered successfully!
We’re also going to need permissions for storage (for preferences) and history (for deleting entries), so add the following into the manifest too:
"permissions": ["history", "storage"],
Adding toolbar icon
Next, we’re going to add a toolbar icon for our extension, so that we can see it is installed and access the options. To do this, we need an app icon in both 48×48 and 96×96 sizes. I’d recommend using Google’s Material Design icon library, and exporting PNG icons in 48dp (this provides both the necessary app sizes). For this tutorial, I’ll use the find_replace icon.
![]()
Once you’ve got your icons, rename them to icon_48.png and icon_96.png, then place them inside an images folder in your project folder. Now that we’ve got image assets, edit the manifest.json to include them as icons (for the extension store), and as a browser_action to appear in the toolbar.
"icons": {
    "48": "images/icon_48.png",
    "96": "images/icon_96.png"
},
"browser_action": {
    "default_icon": "images/icon_96.png"
},
After reloading the extension, it will now appear in your Chrome toolbar! Right clicking it shows an “Options” menu, which currently… opens an empty page. Time to fix that!

Creating the options screen
In this section, we’ll be creating the Chrome extension’s options, where users can edit their scrub list and toggle a scrub summary message.
Options HTML
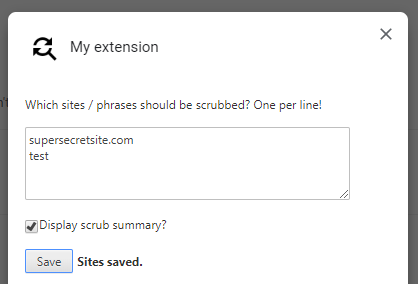
Open up the options.html file inside the project root. The HTML content is very simple, containing a text area, a checkbox, a button, and a status:
<html>
    <body>
        <p>Which sites / phrases should be scrubbed? One per line!</p>
        <textarea id="sites" rows="4" cols="50"></textarea><br><br>
        <label><input id="popup" type="checkbox">Display scrub summary?</label><br><br>
        <button id="save">Save</button> <b id="status" />
        <script src="js/options.js"></script>
    </body>
</html>
Accessing the options screen will now show our options! However, since there’s no functional code yet, it’s not particularly useful.
Create the options.js file inside the js folder, this will contain all of the JavaScript for our options page. The options page contains 2 pieces of functionality; saving preferences, and loading preferences.
Saving options
First, an event listener must be added to the “Save” button, so that saving happens when it is pressed. Add the following into options.js:
document.getElementById('save').addEventListener('click', save);
Now we need to create the save function that the listener calls. This function gets the list of sites from the text area and the “Display scrub summary?” checkbox answer, then places them in Chrome storage. Note that displaySavedMessage is the function to be called when data has been successfully saved. This function just displays a piece of text in the status field of the page, then removes it after 2 seconds.
function save() {
    var sitesToSave = document.getElementById('sites').value;
    var displayPopup = document.getElementById('popup').checked;
    chrome.storage.sync.set({
        sites: sitesToSave,
        popup: displayPopup
    }, displaySavedMessage);
}

function displaySavedMessage() {
    var status = document.getElementById('status');
    status.textContent = 'Sites saved.';
    setTimeout(function() {
        status.textContent = '';
    }, 2000);
}
Loading options
Data is now being saved! The next step is to load this data when the options page is opened. This is done using event listeners again:
document.addEventListener('DOMContentLoaded', load);
Again, we now need to create the load function. The options are pulled from Chrome storage again, this time with a default site list and popup value. Once options are loaded (default or user-set), the UI is updated accordingly.
function load() {
    chrome.storage.sync.get({
        sites: 'supersecretsite.com',
        popup: false
    }, function(items) {
        document.getElementById('sites').value = items.sites;
        document.getElementById('popup').checked = items.popup;
    });
}
Saving and loading data is now complete! This can be tested by changing your options, saving, then reopening the options page. If everything worked, your changes should have persisted.
Clearing out history when clicked
For the actual history clearing, we’re going to need to open up the clear_history.js file created at the very start.
First, add a listener to the browser button being clicked. When clicked, the options will be loaded, then passed to deleteBySites when ready:
chrome.browserAction.onClicked.addListener(function(tab) {
    chrome.storage.sync.get({
        sites: 'supersecretsite.com',
        popup: false
    }, deleteBySites);
});
deleteBySites splits the sites value loaded from Chrome storage, one site per line. numSites is set for later, then for each site deleteBySite is called:
var numSites = 0;
function deleteBySites(storage) {
    var allSites = storage.sites.split("\n");
    numSites = allSites.length;
    for (var i = 0; i < allSites.length; i++) {
        deleteBySite(allSites[i], storage.popup);
    }
}
deleteBySite performs a search of Chrome’s history for the specified phrase, which returns a list of results. These results are then iterated over, deleting all, as well as keeping a running tally of the number of results deleted. Finally, if the popup option is true, the results are passed to siteDeleted.
function deleteBySite(site, popup) {
    chrome.history.search({
            text: site,
            startTime: 0,
            maxResults: 999999
        },
        function(results) {
            var itemsDeleted = 0;
            for (itemsDeleted; itemsDeleted < results.length; itemsDeleted++) {
                chrome.history.deleteUrl({
                    url: results[itemsDeleted].url
                });
            }
            if (popup) {
                siteDeleted(site, itemsDeleted);
            }
        });
}
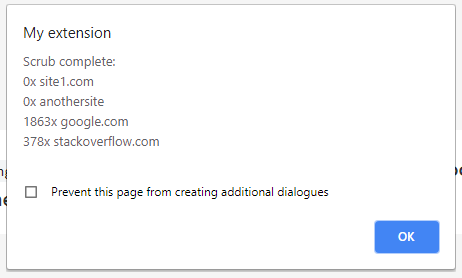
siteDeleted adds the site and deleted entries count to siteString, then displays a summary if every site has been processed. This is checked by making sure sitesProcessed is equal to (or larger than) the numSites we defined earlier. Finally, this text is shown as a popup alert.
var sitesProcessed = 0;
var siteString = "Scrub complete:\n";
function siteDeleted(site, count) {
    sitesProcessed++;
    siteString += (count + "x " + site + "\n");
    if (sitesProcessed >= numSites) {
        alert(siteString);
        sitesProcessed = 0;
        siteString = "Scrub complete:\n";
    }
}
The extension is now fully working! The only thing left to do is prepare it for release, and upload it.
Preparing your Chrome extension for release
Your app’s name and description in your manifest.json should now be changed to something unique. Additionally, you might want to set a `` and a version. Whilst version must be numerical, versionName can be anything you want. Semantic Versioning is a good way of ensuring consistent, understandable version codes.
Finally, right click your extension’s folder, and make a .zip archive of it (“Send to” -> “Compressed (zipped) folder”).
Publishing your Chrome extension
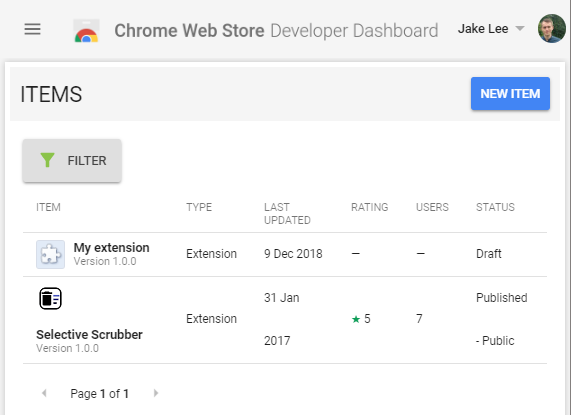
- Go to the beta Chrome Developer Dashboard (you may need to opt in).
- Register as a developer, and pay the necessary $5 registration fee (to prevent spam).
- Click “New item” in the top right, and select your
.zipfile. - You will then have a draft extension, which needs the following fields to be filled in before publishing:
- Extension’s language
- Extension’s primary category
- 1-5 screenshots (1280×800 or 640×400)
Once these 3 fields have been filled in, your extension is ready to publish! However, you’ll likely want to customise the support URLs, app icons, detailed description, and a few other pieces of metadata. When you’re ready to go, press “Publish item” in the top right.
Congratulations, it’s published!
This entire project is available as a repository, and the finished extension can be installed here.
Additional resources: