Positioning Isometric Tiles & Displaying Levels At Optimum Zoom in Android
City Flow is an Android game where players must rotate puzzle tiles until all flows (rivers, paths, etc) match up. Players can play existing levels, or create their own in a level editor. They can zoom in, out, and pan, so as to navigate larger puzzles easily. Whilst playing a level players are on a time limit, so ensuring all of the puzzle is on screen to begin with is very important to ensure the player doesn’t become frustrated having to initially get the puzzle in a good position.
The Solution
To properly display the puzzle, we first need to know the zoom level (referred to as scale factor) for the X and Y axis, then use the lowest one, and try to place the puzzle in the middle of the screen.
Calculating Optimum Zoom
The setupTileDisplay() function takes:
PuzzleDisplay(an interface ofActivity, just with an extra function, not needed for this example)- The list of tiles to display
- The area the tiles will be placed into (
ZoomableViewGroupis originally from here) - The selected tile, selected tile imageview, and whether or not we’re in the editor. This are implementation specific, and not necessary.
public TileDisplaySetup setupTileDisplay(PuzzleDisplayer puzzleDisplayer, List tiles, ZoomableViewGroup tileContainer, Tile selectedTile, ImageView selectedTileImage, boolean isEditor) {
    tileContainer.removeAllViews();

    Setting minimumMillisForDrag = Setting.get(Constants.SETTING_MINIMUM_MILLIS_DRAG);
    int dragDelay = minimumMillisForDrag != null ? minimumMillisForDrag.getIntValue() : 200;
    Pair maxXY = TileHelper.getMaxXY(tiles);

    DisplayValues displayValues = getDisplayValues(puzzleDisplayer.getActivity(), maxXY.first + 1, maxXY.second + 1);
The drag related code is to do with panning the ZoomableViewGroup. The first relevant line is 277, where we call a small helper function that loops through the list of tiles to work out the total puzzle size. This is used later.
The bulk of the actual logic happens inside getDisplayValues():
public DisplayValues getDisplayValues(Activity activity, int xTiles, int yTiles) {
    DisplayMetrics displayMetrics = getSizes(activity);
    int screenHeight = displayMetrics.heightPixels;
    int screenWidth = displayMetrics.widthPixels;

    double totalTilesAmount = (xTiles + yTiles) / 2.0;
    int puzzleHeight = (int) (totalTilesAmount * getTileHeight());
    int puzzleWidth = (int) (totalTilesAmount * getTileWidth());

    float xZoomFactor = screenWidth / (float) (puzzleWidth);
    float yZoomFactor = (screenHeight / (float) (puzzleHeight)) / 2;
    float zoomFactor = Math.min(xZoomFactor, yZoomFactor);

    int offset = puzzleHeight / 2;
    return new DisplayValues(zoomFactor, offset, yZoomFactor < xZoomFactor);
}
First, we get the screen size as DisplayMetrics, since we’ll need that to work out what we can fit on it.
Next, we work out how tall the puzzle is. Since my puzzle tiles aren’t perfectly square, and I’m using an isometric perspective, both the height and width are required to calculate the puzzle width or height. For example, if the puzzle has one more tile on the X axis, it’ll be 0.5 tiles wider, and 0.5 tiles taller (since half will overlap existing tiles).
getTileHeight() and getTileWidth(), convert the fixed dp (display pixels) into actual pixels, based on screen density. Again, a small helper function is used for conversion.
Now we know how screen / puzzle width / height. To calculate the highest possible zoom factor whilst still fitting all of the puzzle on the screen, we calculate the best zoom factor for width and height, then take the minimum.
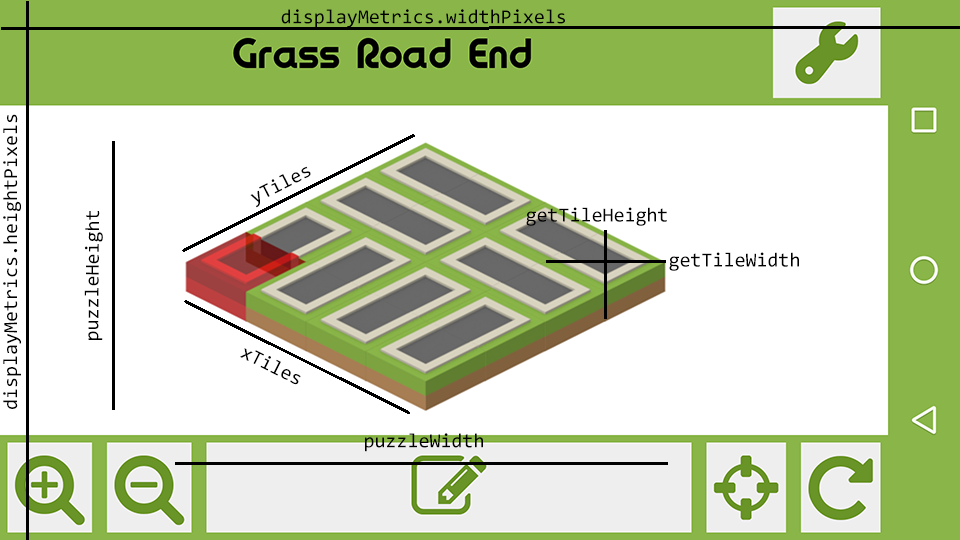
Having trouble visualising all these widths and heights? Here’s an annotated in-game screenshot, with all mentioned values:
We return the optimum zoom factor, how much we should offset the puzzle by, and a quick check of whether the puzzle is going to have space above it or left of it. This is used shortly to calculate where to add an offset to centre the puzzle.
Applying Optimum Zoom
Now that we know the ideal zoom level, we just need to actually apply it to the tiles, by looping through each tile in the list and performing some calculations.
float optimumScale = displayValues.getZoomFactor();

int topOffset = displayValues.isLeftOffset() ? 0 : displayValues.getOffset();
int leftOffset = displayValues.isLeftOffset() ? displayValues.getOffset() : 0;

tileContainer.setScaleFactor(optimumScale, true);
tileContainer.removeAllViews();
for (final Tile tile : tiles) {
    if (!puzzleDisplayer.displayEmptyTile() && tile.getTileTypeId() == Constants.TILE_EMPTY) {
        continue;
    }

    ZoomableViewGroup.LayoutParams layoutParams = new ZoomableViewGroup.LayoutParams(ZoomableViewGroup.LayoutParams.WRAP_CONTENT, ZoomableViewGroup.LayoutParams.WRAP_CONTENT);
    int leftPadding = leftOffset + (tile.getY() + tile.getX()) * (getTileWidth() / 2);
    int topPadding = topOffset + (tile.getX() + maxXY.second - tile.getY()) * (getTileHeight() / 2);
    layoutParams.setMargins(leftPadding, topPadding, 0, 0);

    int drawableId = getTileDrawableId(puzzleDisplayer.getActivity(), tile.getTileTypeId(), tile.getRotation());
    ImageView image = createTileImageView(puzzleDisplayer, tile, drawableId, dragDelay);
From the boolean parameter passed back from getDisplayValues(), we know whether the offset calculated should be applied to the top or left of the puzzle.
City Flow has the concept of “empty” tiles, which are essentially invisible tiles. If we encounter one of those, and the activity we’re displaying the puzzle on doesn’t want to see them, just skip this tile.
The left and top padding calculations are the key to laying out the puzzle. As mentioned before, every tile’s x and y on-screen position both depend on the tile’s x and y order. Using the example before, if a tile is added on the Y axis (top left – bottom right), it will be half a tile height lower than the previous tile, and half a tile width further over to the right. This leads to quite a complex calculation for positioning.
Once we know the margins we want to give the individual tile, we make the imageview and populate it with the correct tile in createTileImageView(). This isn’t necessary for this example.
Finally, we return the selected tile imageview for future reference, and the optimum puzzle scale (inside a basic data structure object TileDisplaySetup(). This is used by custom puzzles in order to take a screenshot of the puzzle ready for sharing, but that’s another article!
    --- snipped lines that handle displaying a tile as selected ---

        tileContainer.addView(image, layoutParams);
    }

    return new TileDisplaySetup(selectedTileImage, optimumScale);
}
The Conclusion
Fitting all of a puzzle on-screen is such a fundamental part of game design that it’s easy to forget it even needs to be done. Whilst I’m sure I’ve somewhat reinvented the wheel with my calculations of positioning, I’ve enjoyed the process of figuring out the maths behind it. The calculations in terms of X and Y and how they relate to the overall positioning are definitely applicable to most games. Luckily, most engines likely have something similar to this already implemented.
In terms of efficiency, the repeated calls to DisplayMetrics() can’t be ideal. However, figuring out the positions for even large (15×15) puzzles is always instant, the bottleneck is in loading the tile images from storage.
The core code used in this article is available on this gist, whilst the helper functions are available on this one.
Disclaimer: I wrote City Flow, I’m featuring it here because I know the codebase very well!