Creating a RecyclerView with multiple content types and layouts in Kotlin
RecyclerViews are a little bit complicated to get started with, but almost every app has one or two of them somewhere. One of the first problems you may encounter when using them is their lack of a built-in way to handle multiple content types. Creating and binding a single layout is very straightforward, but multiple layouts requires a slightly more complex setup.
This tutorial will cover setting that up, as well as providing a simple content generator to test your RecyclerView. This entire project, along with all layouts, is available as a Gist, or as a GitHub repo.
Setting up the RecyclerView
First, create a simple RecyclerView in an xml layout, e.g. activity_main.xml:
<android.support.v7.widget.RecyclerView
        android:id="@+id/recyclerView"
        android:layout_width="match_parent"
        android:layout_height="match_parent" />
Next, inside your onCreate (or onCreateView) setup your RecyclerView‘s adapter (source of content), and layout manager (to handle the layout logic). getSampleRows will be covered at the end of this post, it can just be listOf() for now if you want a passing build.
override fun onCreate(savedInstanceState: Bundle?) {
    super.onCreate(savedInstanceState)
    setContentView(R.layout.activity_main)
    recyclerView.adapter = ContentAdapter(getSampleRows(10))
    recyclerView.layoutManager = LinearLayoutManager(this)
}
Finally, make a ContentAdapter class that implements the RecyclerView adapter:
class ContentAdapter(private val rows: List<IRow>) : RecyclerView.Adapter<RecyclerView.ViewHolder>() { }
Creating the wrapper classes
In this example, there will be 3 types of content: Header, Message, and Colour. Each of these types needs a class defined, to hold any associated information. These should all extends a base class, so that a single list of all the content types can be created. Luckily, with Kotlin class creation is incredibly succinct:
interface IRow
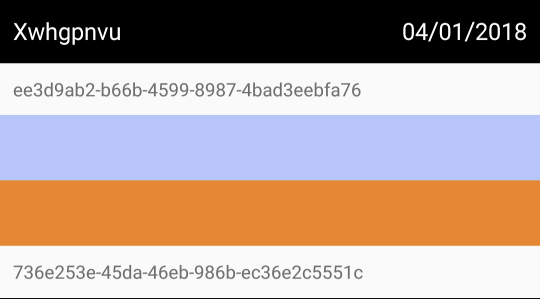
class HeaderRow(val date: String, val title: String) : IRow
class MessageRow(val message: String) : IRow
class ColourRow(val colour: Int) : IRow
Creating the view holder layouts
Each of these types should also have an XML layout:
row_colour.xml:
<?xml version="1.0" encoding="utf-8"?>
<ImageView
        xmlns:android="http://schemas.android.com/apk/res/android"
        android:id="@+id/colour"
        android:layout_height="50dp"
        android:layout_width="match_parent" />
row_header.xml:
<?xml version="1.0" encoding="utf-8"?>
<android.support.constraint.ConstraintLayout
        xmlns:android="http://schemas.android.com/apk/res/android"
        xmlns:app="http://schemas.android.com/apk/res-auto"
        android:layout_width="match_parent"
        android:layout_height="50dp"
        android:background="@android:color/black">
    <TextView
            android:id="@+id/title"
            android:layout_width="wrap_content"
            android:layout_height="wrap_content"
            app:layout_constraintStart_toStartOf="parent"
            app:layout_constraintTop_toTopOf="parent"
            app:layout_constraintBottom_toBottomOf="parent"
            android:paddingStart="10dp"
            android:textColor="@android:color/white"
            android:textSize="18sp"/>
    <TextView
            android:id="@+id/date"
            android:layout_width="wrap_content"
            android:layout_height="wrap_content"
            app:layout_constraintEnd_toEndOf="parent"
            app:layout_constraintStart_toEndOf="@id/title"
            app:layout_constraintTop_toTopOf="parent"
            app:layout_constraintBottom_toBottomOf="parent"
            app:layout_constraintHorizontal_bias="1.0"
            android:paddingEnd="10dp"
            android:textColor="@android:color/white"
            android:textSize="18sp"/>
</android.support.constraint.ConstraintLayout>
row_message.xml:
<?xml version="1.0" encoding="utf-8"?>
<android.support.constraint.ConstraintLayout
    xmlns:android="http://schemas.android.com/apk/res/android"
    android:layout_width="match_parent"
    android:layout_height="wrap_content"
    android:padding="10dp">
    <TextView
            android:id="@+id/message"
            android:layout_width="wrap_content"
            android:layout_height="wrap_content" />
</android.support.constraint.ConstraintLayout>
Creating the view holder classes
Each content type’s ViewHolder should map the UI elements that need to be populated to a local variable that can be referenced later:
class HeaderViewHolder(itemView: View) : RecyclerView.ViewHolder(itemView) {
    val dateView: TextView = itemView.findViewById(R.id.date)
    val titleView: TextView = itemView.findViewById(R.id.title)
}

class MessageViewHolder(itemView: View) : RecyclerView.ViewHolder(itemView) {
    val messageView: TextView = itemView.findViewById(R.id.message)
}

class ColourViewHolder(itemView: View) : RecyclerView.ViewHolder(itemView) {
    val colourView: ImageView = itemView.findViewById(R.id.colour)
}
Defining a constant for each type simplifies the process of creating and binding ViewHolders based on content type:
companion object {
    private const val TYPE_HEADER = 0
    private const val TYPE_MESSAGE = 1
    private const val TYPE_COLOUR = 2
}
onCreateViewHolder should inflate a different layout (and use a different ViewHolder) depending on the content type constant. In this case:
override fun onCreateViewHolder(parent: ViewGroup, viewType: Int) = when (viewType) {
        TYPE_HEADER -> HeaderViewHolder(LayoutInflater.from(parent.context)
            .inflate(R.layout.row_header, parent, false))
        TYPE_MESSAGE -> MessageViewHolder(LayoutInflater.from(parent.context)
            .inflate(R.layout.row_message, parent, false))
        TYPE_COLOUR -> ColourViewHolder(LayoutInflater.from(parent.context)
            .inflate(R.layout.row_colour, parent, false))
        else -> throw IllegalArgumentException()
    }
Binding the view holder
First, the type of the content has to be determined. This can be done by passing the type as a field along with each piece of content, but my preferred approach is using type checking. For example, where rows is the content to be displayed:
override fun getItemViewType(position: Int): Int =
    when (rows[position]) {
        is HeaderRow -> TYPE_HEADER
        is MessageRow -> TYPE_MESSAGE
        is ColourRow -> TYPE_COLOUR
        else -> throw IllegalArgumentException()
    }
Next, now that the content type has been determined, a view holder has to be passed by onBindViewHolder to the appropriate onBind function:
override fun onBindViewHolder(holder: RecyclerView.ViewHolder, position: Int) =
    when (holder.itemViewType) {
        TYPE_HEADER -> onBindHeader(holder, rows[position] as ContentAdapter.HeaderRow)
        TYPE_MESSAGE -> onBindMessage(holder, rows[position] as ContentAdapter.MessageRow)
        TYPE_COLOUR -> onBindColour(holder, rows[position] as ContentAdapter.ColourRow)
        else -> throw IllegalArgumentException()
    }
Each of these onBind functions exists solely to retrieve data from the row item, and set it in the ViewHolder‘s UI element classes:
private fun onBindHeader(holder: RecyclerView.ViewHolder, row: HeaderRow) {
    val headerRow = holder as HeaderViewHolder
    headerRow.titleView.text = row.title
    headerRow.dateView.text = row.date
}

private fun onBindMessage(holder: RecyclerView.ViewHolder, row: MessageRow) {
    (holder as MessageViewHolder).messageView.text = row.message
}

private fun onBindColour(holder: RecyclerView.ViewHolder, row: ColourRow) {
    (holder as ColourViewHolder).colourView.setBackgroundColor(row.colour)
}
Finally, standard RecyclerView functions also have to be implemented:
override fun getItemCount() = rows.count()
Adding example RecyclerView content
For this project, a simple random content creator was made. It generates random integers in a range, random dates in a range, random letter combinations, random UUIDs, and random colours:
class Randomiser {
    companion object {
        fun int(min: Int, max: Int): Int {
            return (min..max).shuffled().last()
        }

        fun date(): String {
            val calendar = Calendar.getInstance()
            calendar.add(Calendar.DAY_OF_YEAR, -int(0, 1000))
            val format = SimpleDateFormat("dd/MM/yyyy", Locale.UK)
            return format.format(calendar.time)
        }

        fun word() = ('a'..'z').map { it }.shuffled().subList(0, 8).joinToString("").capitalize()

        fun message() = UUID.randomUUID().toString()

        fun colour(): Int {
            val rnd = Random()
            return Color.argb(255, rnd.nextInt(256), rnd.nextInt(256), rnd.nextInt(256))
        }
    }
}
This was used to generate a random number of rows for the RecyclerView:
private fun getSampleRows(numSections: Int): List<ContentAdapter.IRow> {
    val rows = mutableListOf<ContentAdapter.IRow>()
    for (i in 1..numSections) {
        rows.add(ContentAdapter.HeaderRow(Randomiser.date(), Randomiser.word()))
        val numChildren = Randomiser.int(0, 10)
        for (j in 1..numChildren) {
            if(Randomiser.int(0, 1) > 0) {
                rows.add(ContentAdapter.MessageRow(Randomiser.message()))
            } else {
                rows.add(ContentAdapter.ColourRow(Randomiser.colour()))
            }
        }
    }
    return rows
}
Conclusion
Hopefully after checking out the repository or the Gist of this tutorial, the approach makes sense. In general, RecyclerViews are extremely powerful, and should almost always be used when there’s a dynamic list of content to be displayed, whether finite or infinite.
This approach is easily extendable, and a future post will cover easily adding sticky headers to this RecyclerView implementation. Good luck!