Using ShareX to take screenshots and upload them to a private Imgur album
The ability to quickly share screenshots with others is essential to day to day conversation / work, especially when talking to people in other offices or countries. The built in Windows Snipping Tool has good basic functionality (e.g. press Win + Shift + S to select an area to copy), but lacks any image uploading functionality, or advanced editing.
This tutorial will let you do the following with ShareX, with one keypress:
- Select an area
- Perform advanced editing (numbering, blurring, pixelating, highlighting, circling etc)
- Copy the selected area to your clipboard, ready to be pasted
- Upload the selected area to a private album on Imgur, and provide you a link in a notification if you need it
Pretty good, for a completely free setup!
Installing ShareX
First, download and install ShareX. It’s also available on Steam.
It has an absolutely staggering number of features (see gif below), and it’s definitely worth having a look at the included tools if you’re ever looking for a new utility program.
Animation from getsharex.com
Once ShareX is running, it will appear in your toolbar. Double clicking the icon opens the settings screen. Whilst it can be a little confusing to navigate, the following steps will cover all you need for this configuration.
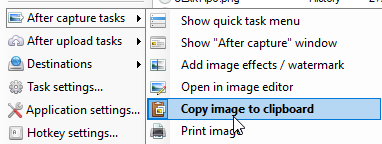
Configuring clipboard copying
Clipboard copying is going to be an “After capture” task. To enable it, click “After capture tasks”, then “Copy image to clipboard”, making sure nothing else is ticked. That’s it!
Configuring Imgur uploading
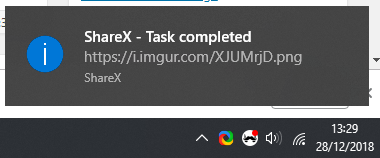
The next stage is uploading your screenshot to imgur, so that it displays in a popup notification. Clicking this notification opens the image in your default browser, so you can easily copy the URL wherever you need to.
Enabling Imgur
First, under “After capture tasks”, enable “Upload image to host”.
Next, set Imgur as your image host under “Destinations”, “Image Uploader”, then “Imgur”.
Connecting ShareX to Imgur
In the same “Destinations” menu, open “Destination settings”. You’ll now need to authorise ShareX to access your Imgur account. This is done by:
- Select “Account type” of “User”.
- Click “Step 1: Open authorize page”.
- This will open your browser. Log in to your Imgur account, and you will be shown a verification code.
- Copy this code into the “Verification code” text box in ShareX.
- Click “Step 2: Complete authorization”.
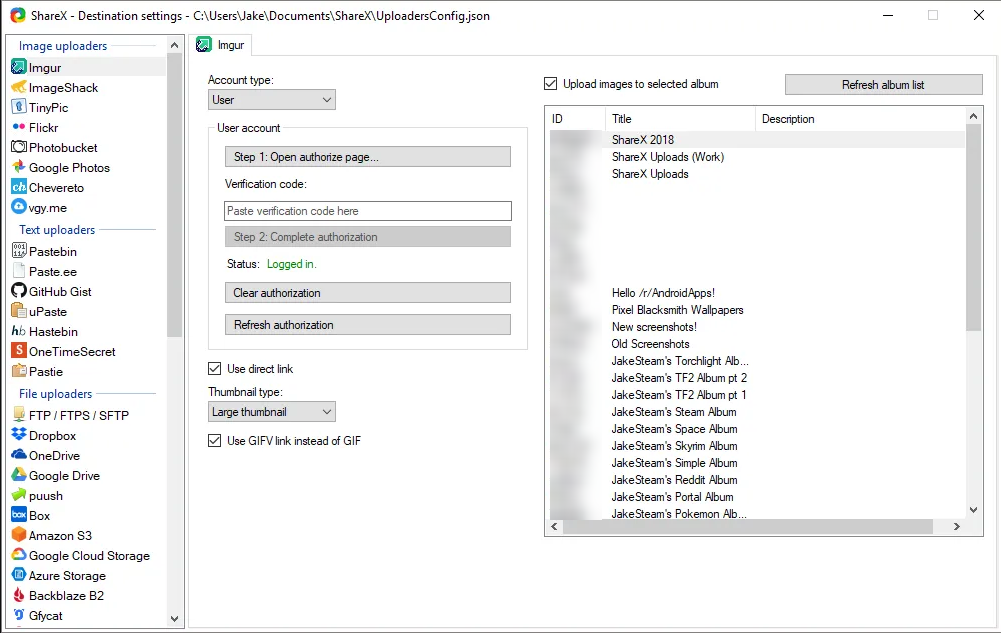
You’re now connected! Time to get an album set up.
Uploading ShareX images to an Imgur album
Make sure “Use direct link” is ticked, then make ShareX upload your images into an album:
- Make a new album on imgur with the privacy “Secret”, so that only you can view it.
- Click “Refresh album list” on the Imgur destination settings in ShareX.
- Select your newly created folder.
- Make sure “Upload images to selected album” is ticked.

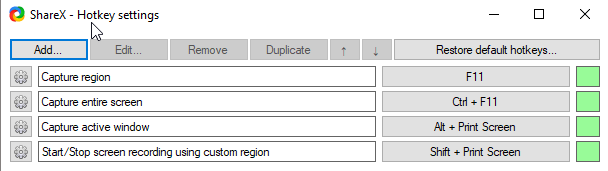
Adding hotkey
Almost there! The final necessary step is setting up a hotkey for your task. Set this under “Hotkey settings”, I find F11 to be most convenient but it can be almost anything.
Your ShareX is now fully setup! Press F11 (or your hotkey), and enjoy your clipboard copying and automatic uploading!
Using ShareX’s screenshot tool
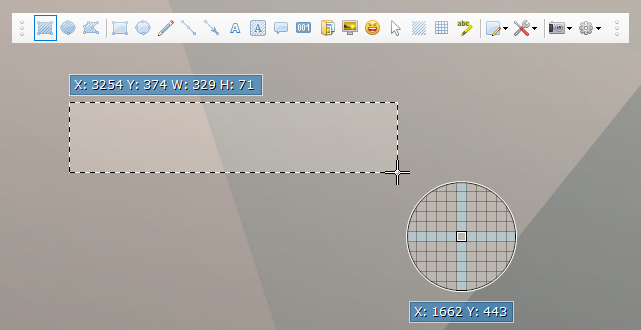
When your hotkey is pressed, the ShareX screenshot tool will popup. Whilst just selecting an area will perform the normal actions, there’s a lot of functionality included which can be very useful. Below is a screenshot of the editor, as well as an explanation of every option, since it can be a little overwhelming.
Main bar (left to right)
- The 3 dot icon lets you move the main bar around the screen.
- The rectangular icon lets you select a rectangular area to capture (default).
- The circular icon lets you select a circular / oval area to capture.
- The odd shaped icon lets you select a custom shape to capture. This can have many points, even overlapping!
- This rectangular icon lets you select a rectangle to overlay on the screen. Selecting this (or the circular overlay) will display options for outline / fill colour.
- This circular icon lets you select a circular / oval shape to overlay on the screen.
- The pen icon lets you draw / write on the captured area.
- The connected dot icon lets you draw lines between areas in the captured area.
- The arrow icon lets you draw arrows.
- The letter “A” lets you add text to the captured area.
- The letter “A” with a background lets you add text, but with a background.
- The speech bubble lets you add a speech bubble to the screenshot.
- The “001” icon lets you start counting. Once enabled, each time you click a new number will appear, one higher than the one before. This is useful for listing steps in a process.
- The folder icon lets you overlay an existing image into your screenshot.
- The monitor icon lets you overlay a part of the screen on your screenshot. Yes, really!
- The emoji icon lets you add a sticker. Google’s blob emojis and a few custom ones are included. The full list is in the source code.
- The pointer icon lets you display a cursor on your screenshot.
- The striped area icon lets you blur a selected area.
- The grid icon lets you pixelate a selected area.
- The “abc” icon lets you highlight a selected area.
- This option (and the next) provide options for the currently selected tool, so vary depending on tool.
- See above.
- The camera icon lets you change the capture area (screen, area, window).
- The settings icon lets you customise the editor with options for crosshair, icons to display, etc.
- Same as #1.
Additional UI
- The “crosshair” icon determines where your cursor currently is. Clicking and holding will let you select an area, whilst a single click will upload the whole screen.
- The “magnifier” lets you zoom in on where your cursor is, to make sure you are getting the perfect pixel.
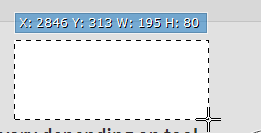
- The X and Y coordinates below your magnifier shown help orientate your cursor in the overall window.
- Additionally, selecting an area shows the below UI, with your cursor’s original X + Y coord, and the selected areas width and height.
Summary
Hopefully you’ve now got your ShareX setup with some basic but useful functionality. There’s a lot more customisation available, this is barely scratching the surface, so experiment by yourself! There is some community support available on the Steam forums and on /r/ShareX.
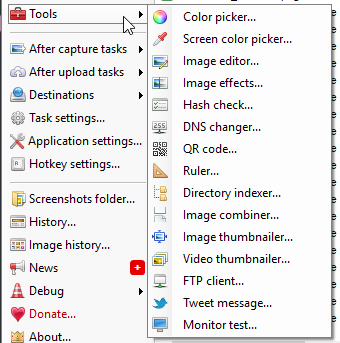
There’s also lots of included tools, many with further customisation, such as those screenshotted below. Gifs can also be recorded, images saved locally, and all kinds of convoluted workflows setup! I use ShareX for all screenshots on this blog, and find it extremely useful, usually capturing 10-30 images per day.