Using PreferenceFragment to effortlessly handle user settings
Handling user settings in an Android app is initially quite straightforward. Most apps use SharedPreferences to save a few booleans or strings, then read these values when necessary.
A downside of this is a lack of safety. You might save the user’s name under “Username”, then retrieve it as “UserName”, resulting in never managing to retrieve the name! You also have to create all the switches, text fields, and sliders yourself. Luckily, PreferenceFragment provides an easy way to safely show and change user preferences.
There is an entire sample project available on GitHub, (and a Gist) for those that prefer to just see the code. Note that some of the code is in Kotlin, but most is XML.
Preparing your project
Whilst we will be using PreferenceFragment in this example, we’ll actually be using PreferenceFragmentCompat to ensure the app looks great on earlier API versions.
To add the preference library, add the following to your app-level build.gradle‘s dependencies and perform a Gradle sync:
implementation 'com.android.support:preference-v7:28.0.0'
Configuring your strings
Every setting in your list needs to have a few strings defined. I recommend doing this in a separate preferences.xml file, to avoid them mixing with your localised strings, but this is personal preference.
For booleans and strings, you need 4 things. In this example, we’re configuring a “Use mobile data” boolean switch:
- An internal reference (the preference’s name in SharedPreferences), e.g.
<string name="pref_useMobileData">useMobileData</string>. - A default value, e.g.
<bool name="pref_useMobileData_default">false</bool>. - A title to be displayed to the user, e.g.
<string name="useMobileData_title">Use mobile data</string>. - A description to be displayed to the user, e.g.
<string name="useMobileData_desc">Sync on mobile networks as well as wifi</string>.
Notice that the default value isn’t a string, and is the datatype of the preference. For numerical settings, there are a few additional parameters required so that a value slider can be displayed:
- The minimum value, e.g.
<integer name="pref_myInt_min">1</integer>. - The maximum value, e.g.
<integer name="pref_myInt_max">10</integer>. - The step value (how much the number can be changed by), e.g.
<integer name="pref_myInt_step">1</integer>.
I’ve previously had problems getting step to be obeyed, but minimum and maximum work reliably. Here’s a complete example of an example integer preference:
<string name="pref_int1">int1</string>
<integer name="pref_int1_step">1</integer>
<integer name="pref_int1_min">0</integer>
<integer name="pref_int1_max">10</integer>
<integer name="pref_int1_default">10</integer>
<string name="int1_title">Set Int 1</string>
<string name="int1_desc">Change the value of the first integer</string>
Configuring your preference UI
Now that your strings are all prepared, you can create a UI out of them. Inside the /res/xml/ folder, create an XML file to configure your preferences screen. I’ve named mine preferences_ui.xml.
This XML file defines a PreferenceScreen root object, and then contains multiple Preference, PreferenceScreen, or PreferenceCategorys. Here’s an example of each in action:
<PreferenceScreen xmlns:android="http://schemas.android.com/apk/res/android">
    <PreferenceScreen
            android:title="@string/open_repo_title"
            android:icon="@drawable/ic_repo"
            android:summary="@string/open_repo_desc">
        <intent android:action="android.intent.action.VIEW"
                android:data="@string/repo_url"/>
    </PreferenceScreen>
    <PreferenceCategory android:title="Booleans">
        <SwitchPreference
                android:key="@string/pref_boolean1"
                android:defaultValue="@bool/pref_boolean1_default"
                android:title="@string/boolean1_title"
                android:icon="@drawable/ic_one"
                android:summary="@string/boolean1_desc"/>
        <SwitchPreference
                android:key="@string/pref_boolean2"
                android:defaultValue="@bool/pref_boolean2_default"
                android:title="@string/boolean2_title"
                android:icon="@drawable/ic_two"
                android:summary="@string/boolean2_desc"/>
    </PreferenceCategory>
</PreferenceScreen>
PreferenceScreen
Whilst a PreferenceScreen is the root of your UI, it can also be used to nest additional screens of preferences inside your main layout. Additionally, it can be used to open a desired URL, such as an app’s code repository (with the URL stored in strings.xml):
<PreferenceScreen
        android:title="@string/open_repo_title"
        android:icon="@drawable/ic_repo"
        android:summary="@string/open_repo_desc">
    <intent android:action="android.intent.action.VIEW"
            android:data="@string/repo_url"/>
</PreferenceScreen>
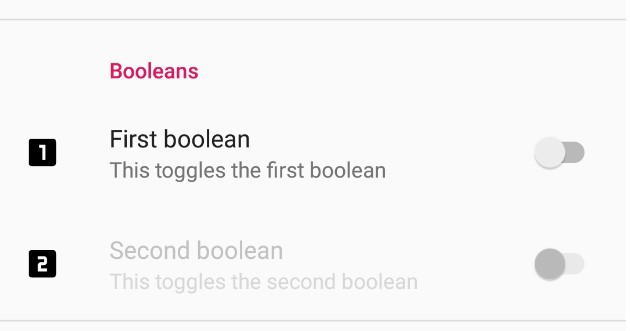
PreferenceCategory
When dealing with many options, grouping them into categories helps associate related options. To help with this, including preferences inside a PreferenceCategory adds a faint line between itself and other elements, and can also be given a title:
Preference
Preferences are what handle the actual value changing. There’s a SwitchPreference for booleans, EditTextPreference for strings, and a SeekBarPreference for integers among others. What they all have in common is the following attributes:
android:key: The setting identifier. This should be your internal reference from earlier, e.g.pref_useMobileData.android:defaultValue: The default value. This should be your default value from earlier, e.g.false.android:title: Your title defined earlier.android:summary: Your description defined earlier.android:icon: Whilst optional, adding a drawable reference here makes each setting easily identifiable.
Setting up your fragment
Now that your preferences_ui.xml file is all set up, it needs to actually be utilised.
First, make a PrefsFragment file that extends PreferenceFragmentCompat. Override onCreatePreferences to set your custom preferences screen:
class PrefsFragment : PreferenceFragmentCompat() {
    override fun onCreatePreferences(savedInstanceState: Bundle?, rootKey: String?) {
        addPreferencesFromResource(R.xml.preferences_ui)
    }
}
Navigating to your fragment
Next, add a link to your soon-to-be-created settings fragment however you currently utilise fragments. For example, I have a FrameLayout in my XML called fragment_frame, so I replace that with my fragment inside my Activity’s onCreate:
override fun onCreate(savedInstanceState: Bundle?) {
    super.onCreate(savedInstanceState)
    setContentView(R.layout.activity_main)
    this.supportFragmentManager
        .beginTransaction()
        .replace(R.id.fragment_frame, PrefsFragment())
        .commit()
}
That’s it! You can now navigate to your settings page, and save and load as many booleans, integers, and strings as you like! However, there’s a lot of extra functionality that you’ll be missing out on…
Adding extra functionality
Dependent boolean preferences
android:dependency allows a setting to be disabled until another setting has been turned on. This is useful for disabling feature configuration until the setting is enabled. To use it, just add the enabling preference’s key as the dependency value on the preference being enabled. For example, to disable boolean2 unless boolean1 is turned on:
<SwitchPreference
        android:key="@string/pref_boolean1"
        android:defaultValue="@bool/pref_boolean1_default"
        android:title="@string/boolean1_title"
        android:icon="@drawable/ic_one"
        android:summary="@string/boolean1_desc"/>
<SwitchPreference
        android:key="@string/pref_boolean2"
        android:defaultValue="@bool/pref_boolean2_default"
        android:title="@string/boolean2_title"
        android:icon="@drawable/ic_two"
        android:dependency="@string/pref_boolean1"
        android:summary="@string/boolean2_desc"/>
Listening for preference changes
Another very useful addition to a preference screen is the ability to react when a setting changes. For example, my APOD Wallpaper app disables background tasks as soon as background sync is turned off.
This is done by letting the fragment listen to preference change events, then checking the events for the preference that is changed.
First, make your PrefsFragment implement SharedPreferences.OnSharedPreferenceChangeListener.
Next, start listening to changes inside onResume and stop listening inside onPause:
override fun onResume() {
    super.onResume()
    preferenceScreen.sharedPreferences.registerOnSharedPreferenceChangeListener(this)
}

override fun onPause() {
    super.onPause()
    preferenceScreen.sharedPreferences.unregisterOnSharedPreferenceChangeListener(this)
}
Finally, set up your change listener. The key passed to it is the key defined in your preferences XML. The preference can be retrieved with findPreference(key), which can then be checked for type / value (e.g. is SwitchPreference or pref.isChecked). In this example, when the first string preference changes, display the new value in a toast:
override fun onSharedPreferenceChanged(sharedPreferences: SharedPreferences, key: String) {
    when (key) {
        getString(R.string.pref_string1) -> {
            val pref = findPreference(key) as EditTextPreference
            Toast.makeText(activity!!, "String changed to ${pref.text}", Toast.LENGTH_SHORT).show()
        }
    }
}
Adding custom action in preferences
The final functionality covered is setting up a custom action. For example, you may want a button that displays the current status of the app in an AlertDialog. To set this up, first set up an onPreferenceClickListener inside onCreatePreferences:
override fun onCreatePreferences(savedInstanceState: Bundle?, rootKey: String?) {
    addPreferencesFromResource(R.xml.preferences_ui)
    findPreference(getString(R.string.pref_show_values)).onPreferenceClickListener = showValuesListener
}
This listener can do anything you like, and is an easy way to extend the functionality of your settings page. For example, the APOD Wallpaper app mentioned earlier uses 6 listeners, for everything from giving feedback to viewing current app status.
private val showValuesListener = Preference.OnPreferenceClickListener { _ ->
    val prefHelper = PreferenceHelper(activity!!)
    AlertDialog.Builder(activity!!)
        .setTitle(R.string.values_title)
        .setMessage(R.string.values_text)
        .setPositiveButton(R.string.values_close) { _, _ -> }
        .show()
    true
}
Conclusion
For many applications, just this preference fragment combined with change listeners will be enough to manage user preferences. Using the PreferenceFragment skips a lot of repetitive code involved in making a layout, and allows you to focus on correctly responding when settings change.
The next post in this series will cover programmatically getting / setting values, using the existing preferences.xml values.