How To Migrate A Subdomain Site From WordPress.com To Another Host
As you may have (hopefully not!) noticed, this blog was recently moved from WordPress.com’s hosted solution to another host, namely Bluehost. Bluehost were chosen due to being the only host recommended by both WordPress.com and WordPress.org, and their low prices. This post isn’t sponsored by them! This tutorial will walk through every step taken by myself during this process, to hopefully give you an idea of the work involved and avoid the same mistakes being made.
Note that WordPress.com also offer a “guided transfer” for $129, but none of the steps are too challenging if you’ve got a few hours spare! Before beginning this tutorial, it’s worth pointing out that I used Cloudflare to handle my site’s subdomain being provided by a different host. If you are using a raw domain (e.g. http://example.com), or another CDN / domain registrar, the Cloudflare steps will be slightly different. The other steps will be unchanged.
Preparing old blog
Disable scheduled / automatic actions
The first step in transferring host is preparing your blog for the migration, so that nothing interferes with the transfer. If there are any scheduled posts, their scheduled times should be changed to a day or so later, otherwise they may get published during the transfer and not be published correctly. Next, any automatic actions hooked into your WordPress.com account need to be temporarily disabled, as they may get confused. For example, I was using IFTTT to automatically tweet blog posts on my Twitter (example). I disabled this recipe during the transfer to avoid all old posts being seen on the new blog for the first time and being tweeted. If you have plugins installed (not available on most WordPress.com plans), make sure any that may interfere are disabled.
Export data
To export all of your existing pages, posts, categories, tags, and much more, WordPress luckily includes a built in exporter. This can be found at yoursite.com/wp-admin/export.php, make sure “All content” is selected for export. Clicking “Download Export File” will then queue up an export, a link to which will be emailed to you within a few minutes. 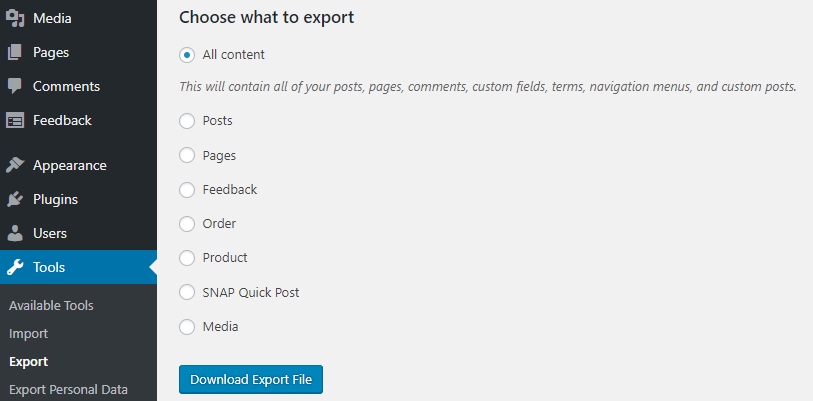
This export will consist of an XML file (technically a Wordpress Extended RSS file), which will be needed in the next step.
Set up new blog
Once you’ve selected your plan, paid, and filled in all necessary information, you should have access to your new wordpress dashboard (e.g. Bluehost’s). Currently your brand new blog will have an example post, and a default theme. It’ll also be hosted on an odd domain similar to box1234.temp.domains/~yourusername. Your old blog will continue to work until you move onto the next step, Cloudflare, so take your time ensuring your new blog design is perfect before continuing.
Import data
To import data, first install and activate the WordPress Importer plugin, it may even be enabled by default. Once this is done, under the “Import” page under “Tools”, the wordpress option will have a “Run importer” link, taking you to the plugin’s import page. Upload your export file from your old blog, and import it.
All posts, pages, categories, and tags should now be imported successfully, although you may notice some minor formatting issues. Many of these will be fixed in the following steps, so it’s recommended to fix any incorrectly formatted posts after all of the following steps have been completed. 
Repick theme
Assuming you were using a built-in WordPress.com theme, it should be available in your host’s theme library. If not, it should be available in the official WordPress.org theme library. These can be previewed and installed very easily via the “Themes” page under “Appearance”.
Reconfigure theme
You may have configured your theme to have custom widgets in your sidebar(s). Make sure to also add these all to your new blog, you can use your old blog as a reference to ensure none are missed / misconfigured.
Reinstall plugins
Finally, go through your plugins list and make sure they have all been installed again, copying across any configurations as necessary. This may also be a good time to trim your plugins list (/wp-admin/plugins.php), and get rid of any you don’t actually need!
Set up Cloudflare / Domain Host
Cloudflare is going to be used to redirect all requests to your blog’s subdomain (e.g. blog.example.com) to your host. This can be a little tricky, as there were a few missteps during my attempt (at least when transferring to Bluehost).
Get account IP
On your host (e.g. Bluehost), find out which IP your blog is served from. For Bluehost, this can be found under “Advanced” -> “Server Information” -> “Shared IP Address”. You can also open command prompt and enter ping temporaryblogurl.yourhost.com (using your temporary blog URL of course!) and it should return the IP it is being served from. I didn’t realise this when setting it up, and had to get their (very patient) chat support to help me find it!
Set up CNAME + A record
Now that you have the IP, you can tell Cloudflare (or wherever else your site is hosted) to redirect all blog subdomain requests to it. This is done by adding (or editing) 2 new “A” (alias) records. The first should have a Name of “blog” and an IPv4 address of your IP from earlier. The second should have a Name of “www.blog” and the same IPv4 address again. The “Status” should also be set to DNS only (grey cloud), or you’ll experience redirect issues caused by your host struggling to direct traffic properly. These changes should take effect immediately, but can take a few hours to propagate around various servers on the internet and be properly applied. 
Change site URL on BlueHost / your host
Now, your new site needs to know where you just set it up to appear! It needs to know the URL it is appearing at, this ensures all page links go to the correct place and no images / other content is lost. On Bluehost, this option is found under “My Sites”, mouseover your new site then “Manage Site”. Under the “Settings” tab the Site URL can be set to the full URL of your blog. You should also use this opportunity to look at the other settings on this page, and turn off the “Coming Soon Page” to make sure users can actually see your site. 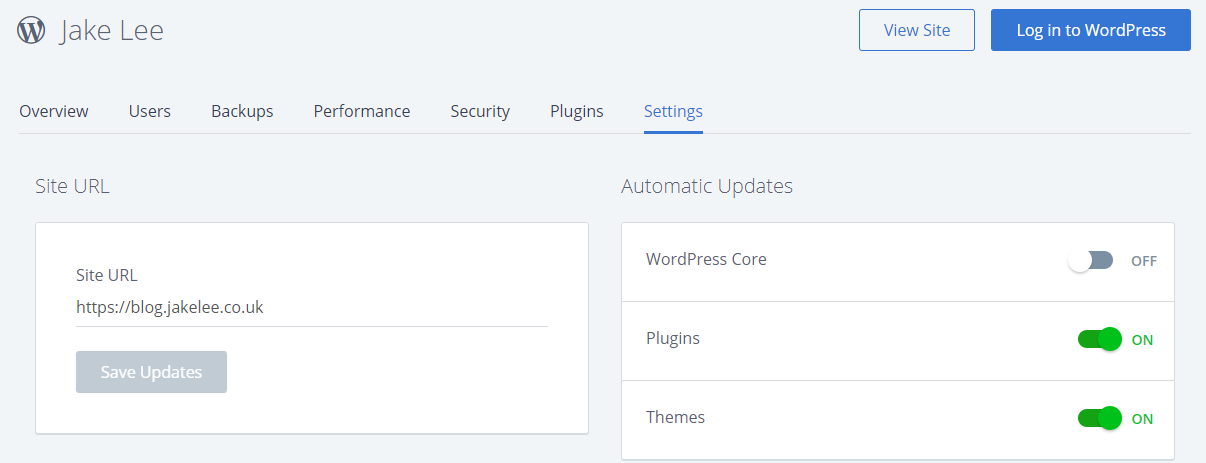
Fix URLs
You may notice that your post’s URLs have changed. My post structure changed from domain.com/year/month/day/post-name to domain.com/post-name. I decided I preferred this change, so updated any internal links to point to the correct URL. I also had Google Search Console enabled, so I was informed of any broken links. To ensure any search results still worked, I used Yoast SEO‘s “Tools” -> “File editor” to redirect all of the old format links to the new format. I did this by adding the following line to the top of my .htaccess file:
RewriteRule ^([0-9]+)/([0-9]+)/([0-9]+)/(.*)$ /$4 [R=301,NC,L]
There are other tools for editing this file, I just used Yoast because I already had it installed. ### Fix posts
Finally, have a look over your posts, particularly the most complicated ones. Whilst most of the earlier issues should be resolved by the newly installed plugins and fixed URL, minor issues may remain. For example, on my blog the code formatting had broken slightly due to the plugin used, so some of my posts had to be corrected manually.
Conclusion
Whilst moving away from the simple and straightforward WordPress.com can be intimidating, the freedom provided by other hosts is easily worth it. Most hosts offer plans similarly priced to the most basic WordPress.com plan, but offer the ability to customise your site as much as you like. The ability to install plugins also means you can set up functionality (for free) like autoposting to social media, improving your SEO, and backing up your site’s posts to another site.