Developing Android Apps With Firebase Authentication
Firebase Authentication provides an app with the ability to handle user registration, user logging in, and retrieving user data. It has the ability to integrate with phone-based authentication as well as common services such as Facebook, Twitter, and Github. This tutorial will cover the simplest integrations, email and Google account.
This post is part of The Complete Guide to Firebase. Throughout this tutorial, you’ll need access to the Firebase Authentication dashboard, and the official documentation may be useful too.
Implementation
As always, the entire Firebase Reference Project is open source, and there is a pull request for adding Firebase Authentication if you just want to see the code changes required.
This tutorial assumes you already have Firebase added to your project.
Adding dependencies
To add Firebase Authentication, only the Auth library is needed in your app-level build.gradle file:
implementation 'com.firebaseui:firebase-ui-auth:4.1.0'
Enabling sign-in methods
Next, the required sign in methods need to be activated in the console. For each, click the relevant row then toggle “Enable”, whilst leaving the other settings as default.
The first, email, is very simple. No extra work is required, and it also allows the user to set a password to log back into their account later.
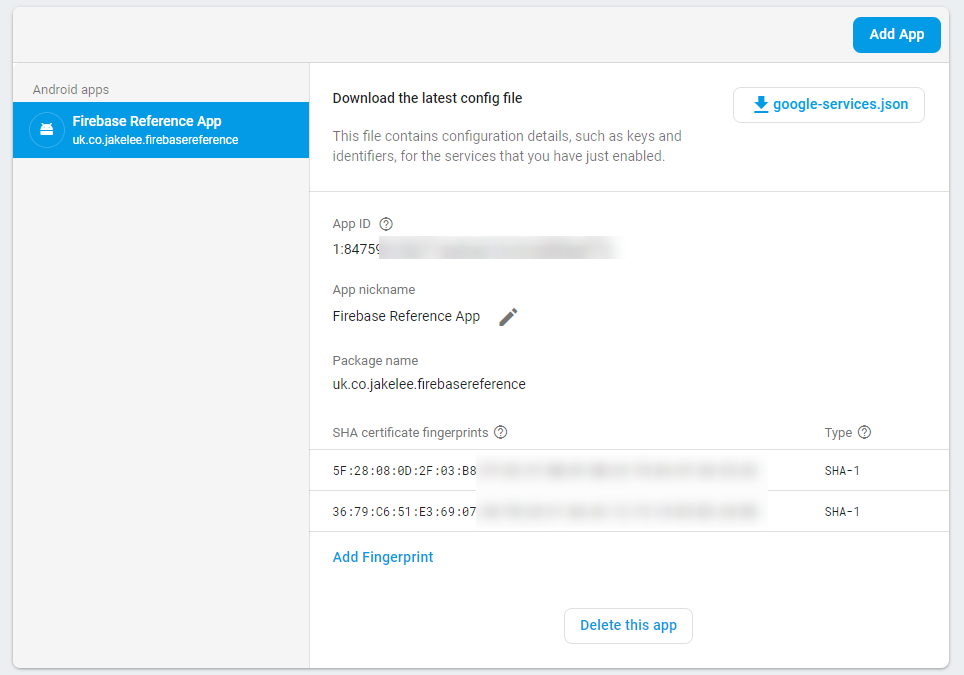
The second, Google account, requires some more work. The SHA-1 fingerprint of your keystore (used to verify a version of your app is legitimate) needs to be added to your Settings page. With your settings page open, a SHA-1 fingerprint can be added by pressing “Add Fingerprint”. This should be done for both debug and release keystores, so that Firebase Auth works in development and when released.
A full guide to generating a SHA-1 fingerprint is provided by Google.
Eventually, your settings page should look like the image below. If the SHA-1 fingerprints have not been added correctly, you will see error code 16 when attempting to use Google-based login.
Your Firebase project is now ready to receive authentication requests from your app, time to add them!
Signing in
Signing in just requires setting the login methods desired (called providers), and starting Firebase Auth’s login activity along with a request code. Once the sign-in attempt is completed (successfully or unsuccessfully), onActivityResult will be called. The following function can be called when a login button is pressed.
    private fun clickLogin() = startActivityForResult(
            AuthUI.getInstance()
                    .createSignInIntentBuilder()
                    .setAvailableProviders(listOf(
                            AuthUI.IdpConfig.EmailBuilder().build(),
                            AuthUI.IdpConfig.GoogleBuilder().build()))
                    .build(), REQUEST_CODE)
Customisation
The login experience can be customised to better fit your app. By default your app’s default theme is used, but a custom theme can be set using setTheme() on the SignInIntentBuilder. Additionally, calling setLogo() allows a drawable (e.g. your app’s logo) to be shown in the middle of the screen. Finally, custom Terms of Service and Privacy Policy links can be added using setTosAndPrivacyPolicyUrls(). The following snippet functions identically to that above, but is much more customised:
    private fun clickCustomLogin() = startActivityForResult(
            AuthUI.getInstance()
                    .createSignInIntentBuilder()
                    .setAvailableProviders(listOf(
                            AuthUI.IdpConfig.EmailBuilder().build(),
                            AuthUI.IdpConfig.GoogleBuilder().build()))
                    .setLogo(R.drawable.ic_firebase)
                    .setTheme(R.style.AuthenticationCustomTheme)
                    .setTosAndPrivacyPolicyUrls(
                            "https://google.com",
                            "https://firebase.google.com")
                    .build(), REQUEST_CODE)
Validating login
Once onActivityResult is called, the result needs to be checked to ensure it:
- Is the result of the Firebase Auth sign-in
- Was successful
This can be done by ignoring other requests (by returning early), and checking the result code:
   override fun onActivityResult(requestCode: Int, resultCode: Int, data: Intent?) {
        super.onActivityResult(requestCode, resultCode, data)
        if (requestCode != REQUEST_CODE) return
        if (resultCode == RESULT_OK) {
Alternatively, if the resultCode is not RESULT_OK, we can try and retrieve a useful error message from the data returned by Firebase, then display it to the user:
       } else {
            IdpResponse.fromResultIntent(data)?.let {
                val errorCode = it.error?.errorCode
                val errorMessage = it.error?.localizedMessage
                Toast.makeText(activity, String.format(getString(R.string.authentication_login_error), errorCode, errorMessage), Toast.LENGTH_SHORT).show()
            }
Get user information
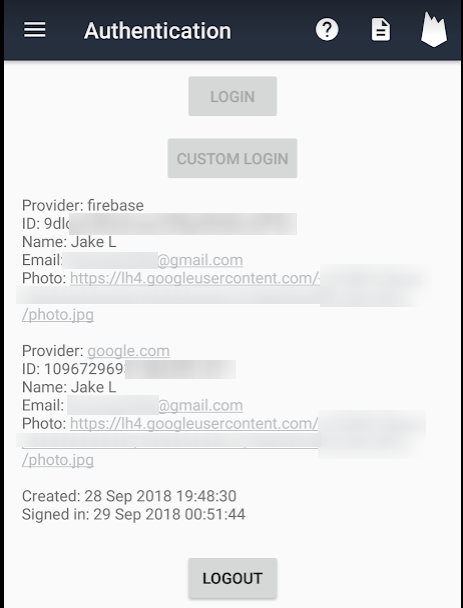
Now that login has been successful, we can lookup the current user in Firebase using val user = FirebaseAuth.getInstance().currentUser and start extracting data. The unix timestamp for app account created (creationTimestamp) and last sign in (lastSignInTimestamp) are stored in user.metadata.
Most of the useful information is stored within the user.providerData; an array of every service the user has authenticated to your app with. This will usually only have 1 service in it, and the data available does vary by provider. That being said, the following should usually be available on each provider:
providerId: The provider’s name, e.g. “firebase”.uid: The user’s ID for that provider, format varies between provider.displayName: The name the user has chosen on that provider.email: The email the user signed up to the provider with.photoUrl: A publicly accessible image URL containing the user’s profile picture for that provider.
This data is shown in the reference app:
Signing out
Signing the user out is even easier than logging in, as the callback is included, instead of requiring a separate function:
   private fun clickLogout() =
            AuthUI.getInstance()
                    .signOut(activity!!)
                    .addOnCompleteListener {
                        Toast.makeText(activity!!, getString(R.string.authentication_logged_out), Toast.LENGTH_SHORT).show()
                    }
Web interface
The web interface consists of 4 tabs for Authentication, as follows:
Users
This tab provides a list of all users signed up for your app, and allows searching for specific users and resetting their password or deleting / disabling their account.

Sign-in method
This tab consists of general options relating to signing in:
- Authorised domains: A list of domains permitted to use OAuth redirects. This should not need to be modified.
- One account per email address: An option controlling whether the same email address at multiple providers should be merged into one account or not. On by default.
- Manage sign-up quota: By default, the same IP can register 100 accounts per hour. This can be increased or decreased if necessary.
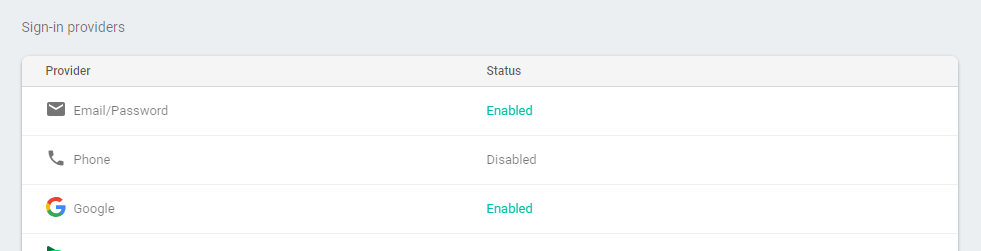
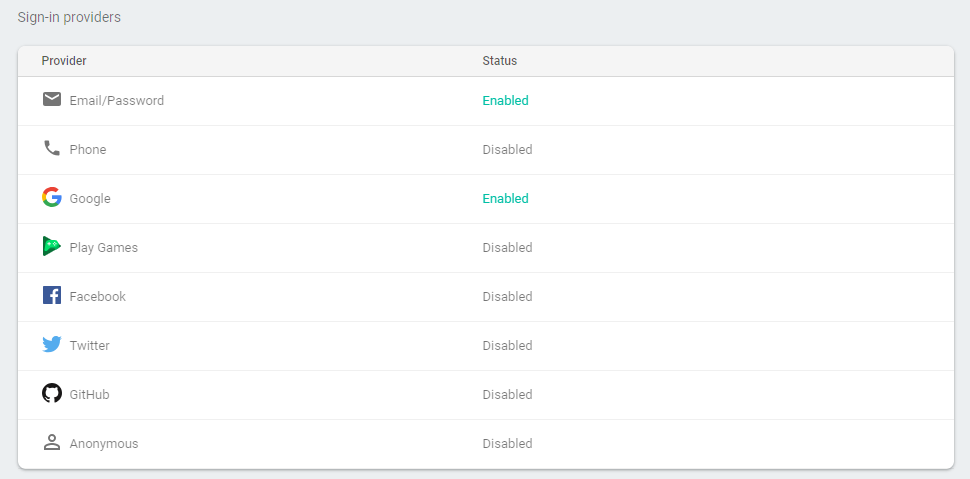
- Sign-in providers: A list of all potential sign-in providers (shown below), as well as guidance on how to configure them.
Templates
This tab enables customisation of various customer communications, such as the email verification email, SMS verification text, and the ability to use a custom mail server for all emails.
Usage
This tab outlines the amount of phone verifications used in the current month. US & Canada & India are allowed 10k combined total, and the rest of the world is also allowed 10k combined total.
Conclusion
Overall, Firebase Authentication is extremely easy to use, whilst still providing very advanced functionality. It is completely free, and the only limitation is the number of phone authentications permitted per month.
For many apps, the system will easily be enough to manage all user account needs, with or without an additional server behind it. For more advanced solutions, a custom authentication can be configured, or even anonymous logins. These usually extremely complicated functionalities are reduced to a few lines of code with Firebase, making it a serious contender for any new major app development.
Previous: Adding Firebase to an Android Project
Next: Developing Android Apps With Firebase Cloud Firestore