Custom Alert Dialog With Dynamic Buttons in Android
Alert Dialogs are an excellent way of providing a confirmation screen, or letting users select from a set of options. However, customising them can be tricky, and they have a maximum of 3 buttons (positive, neutral, negative), all of which are positioned differently in different Android versions. If advanced customisation or more than 3 buttons are required, the usual method of modifying colours etc (styles) isn’t enough!
The Solution
The core part of the solution is using our own layout for the alert dialog, and handling button creation ourselves. Once we’ve created custom layouts, they’ll need to be populated, and passed Runnables of the actions to be performed.
Layouts
First, a layout is required for the dialog, and for the buttons. Examples are available on this article’s gist, but essentially the dialog layout is a simple linearlayout with textviews, and the button layout is just a styled textview.
Inflating
The parameters required to create an AlertDialog using the custom class are context (for inflating), title text, body text, and any number of DialogActions.
A DialogAction is a container object that holds the text to be displayed on a button, and the Runnable that should be run when it is clicked. It doesn’t need any functionality besides getters and setters, so is a very simple construct:
public class DialogAction {
    private String text;
    private Runnable runnable;

    public DialogAction(String text, Runnable runnable) {
        this.text = text;
        this.runnable = runnable;
    }

    public String getText() {
        return text;
    }

    public void setText(String text) {
        this.text = text;
    }

    public Runnable getRunnable() {
        return runnable;
    }

    public void setRunnable(Runnable runnable) {
        this.runnable = runnable;
    }
}
First, we create an alertdialog using the custom_alert_dialog layout we created earlier. We also set the title and body, and define the button container ready for the next step. We also define the layoutparams to be used when the buttons are added to the container. The most important part of the parameters are the 1 at the very end, this gives every textview added the same weight, so that they will be stretched equally.
private static void displayAlertDialog(Context context, String title, String body, DialogAction... actions) {
    LayoutInflater inflater = LayoutInflater.from(context);
    final LinearLayout.LayoutParams params = new LinearLayout.LayoutParams(ViewGroup.LayoutParams.MATCH_PARENT, ViewGroup.LayoutParams.WRAP_CONTENT, 1);
    final View inflatedLayout = inflater.inflate(R.layout.custom_alert_dialog, null);
    final AlertDialog dialog = new AlertDialog.Builder(context).create();
    dialog.setView(inflatedLayout);

    ((TextView)inflatedLayout.findViewById(R.id.title)).setText(title);
    ((TextView)inflatedLayout.findViewById(R.id.body)).setText(body);
    final LinearLayout buttonContainer = (LinearLayout)inflatedLayout.findViewById(R.id.buttonContainer);
Next, we loop through each DialogAction passed to displayAlertDialog(), set the button text, and set the onclick action to be the defined Runnable, and then closing the alertdialog. Each button is then added to the button container, and finally the alertdialog is displayed.
for (final DialogAction action : actions) {
        TextView button = (TextView)inflater.inflate(R.layout.custom_alert_dialog_button, null);
        button.setText(action.getText());
        button.setOnClickListener(new View.OnClickListener() {
            @Override
            public void onClick(View view) {
                action.getRunnable().run();
                dialog.dismiss();
            }
        });
        buttonContainer.addView(button, params);
    }

    dialog.show();
}
That’s it! It’s a relatively simple concept, but allows a lot more flexibility and consistency between Android versions.
Example
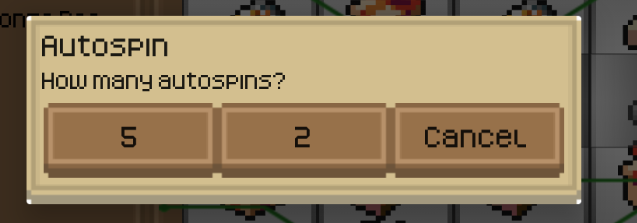
An example of actually displaying an alertdialog using this technique is below, it is called when the player runs out of items in the slots game Blacksmith Slots. In this instance 3 DialogActions are used, the first of which has no action inside the run() method, so just closes the alert dialog. Since we have access to the activity at this stage, the alertdialog buttons can easily perform actions on the activity, such as starting another activity.
public static void outOfItems(final Activity activity, final int itemTier, final int itemType) {
    displayAlertDialog(activity, activity.getString(R.string.outOfItems), activity.getString(R.string.outOfItemsLong),
            new DialogAction(activity.getString(R.string.lowerBet), new Runnable() {
                @Override
                public void run() {

                }
            }),
            new DialogAction(activity.getString(R.string.exit), new Runnable() {
                @Override
                public void run() {
                    activity.finish();
                }
            }),
            new DialogAction(activity.getString(R.string.shop), new Runnable() {
                @Override
                public void run() {
                    activity.startActivity(new Intent(activity, ShopActivity.class)
                            .putExtra("tier", itemTier)
                            .putExtra("type", itemType)
                            .addFlags(Intent.FLAG_ACTIVITY_REORDER_TO_FRONT));
                }
            }));
}
The Conclusion
Alert dialogs are very easy to use, but can be tricky to customise. Using a custom layout allows full control over the dialog, and the code in this article can easily be expanded on to create more advanced functionality. It’s also worth noting that 9patch images should be used as a background for the button & alertdialog layouts, as it allows the elements to resize without stretching.
The full gist of code used is available here.